Wood working “+10,000 Step By Step Plans ...even if you don't have a large workshop or expensive tools!“ Click Here 👈 Transc...
Wood working
“+10,000 Step By Step Plans ...even if you don't have a large workshop or expensive tools!“ Click Here 👈
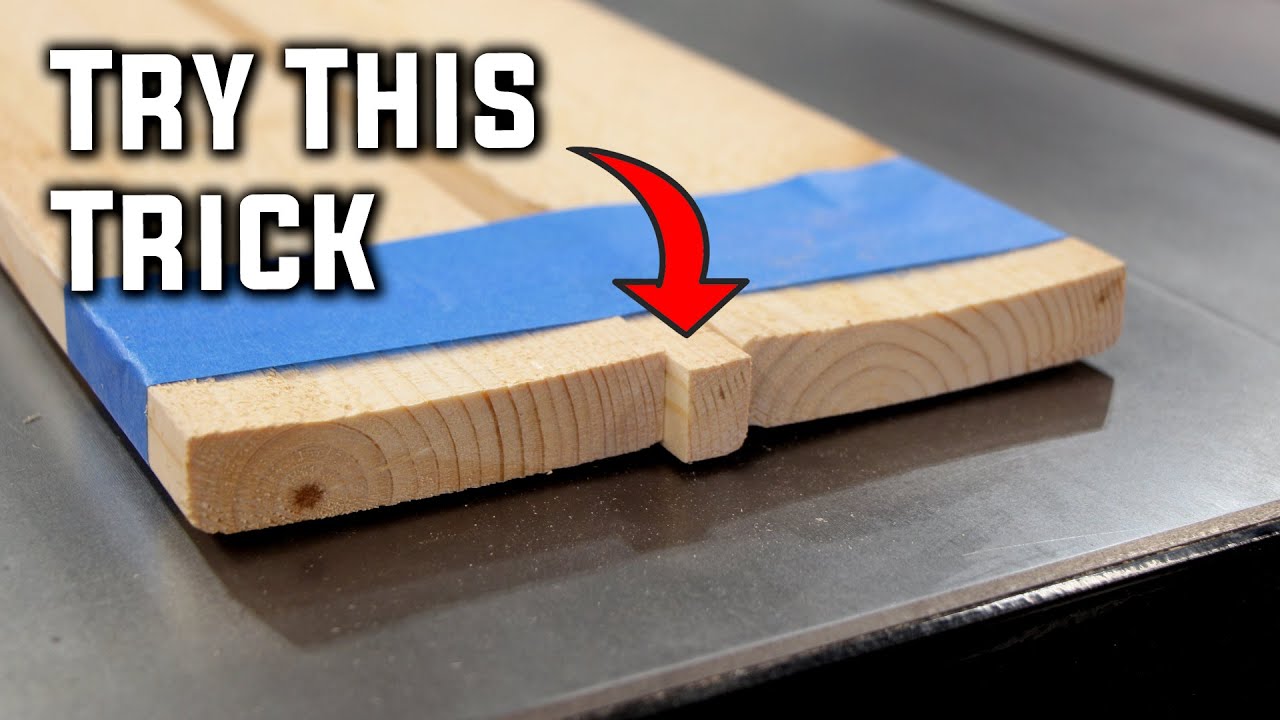
Transcript tonight i'm going to show you all of my favorite woodworking tips and tricks that i use when i'm out building stuff in my shop [Music] one of the ways you can tell an experienced woodworker is they usually have a lot of tips tricks and other secrets that they have for building projects that make it a lot easier so what i'm going to show you tonight are some of the tips and tricks that i use regularly in my shop to be able to get things done faster and to be more efficient the first couple tricks i'm going to show you involve a lot of blue tape this stuff is awesome in a woodworking shop this is just regular painters tape that you get at your big box store it has just enough adhesive that it'll stick and hold well but it won't leave residue so let's say you're going to make a taper that goes from three and a half inches wide down to three inches wide most of the taper jigs can't handle that length because you're going to be so far off the table that means you have a half inch difference between those two ends of the board so cut a block of wood that's a half inch wide then you find another straight board that is the same length as the taper you're about to cut take the half inch block you just cut and put it between the straight board and the one that you want to have tapered then pull out your trusty blue tape tape it together at the top of the taper where those two boards come together and tape it together at the bottom where you have the block in there you need to tape it so that block stays in place wrap that around a couple times until you have it nice and secure it doesn't have to be pretty but it does need to be flat on the bottom because you're going to run this through a table saw then you set your table saw fence to be the exact width of the two boards that you have taped together at the top that way when you start cutting your taper you'll start at the three and a half inch end and you'll cut all the way down straight and at the other end you'll end up with three inches that will give you your perfect taper i've used this method for cutting a lot of different lengths of tapers the longest one i did was about six feet and it worked perfectly the next tip also involves the blue tape if you're trying to cut out curved shapes that need to be exactly the same this trick is one of my favorite go-to's take all the boards that you want to be exactly the same and tape them together in multiple directions this makes sure that they stay aligned while you're cutting now take it over to your band saw or your jigsaw and cut out that shape then with your tape still on you can take it over to a sander and sand down all of the edges and all the contours to get these two exactly the same i tried doing this on a shop organization project that i was doing where i was taping together seven different shelves i did it in all directions and then i cut them out on the bandsaw i went and sanded them on the sander and they came out exactly the same you don't need tape between each board and even if you cut off one edge that has tape on it the other pieces usually hold it together pretty well another one of my favorite tips to do with blue tape is to use it to reduce tear out this happens on a table saw when you have a veneer on a plywood or if you have let's say melamine that you're cutting on it if you're not careful it will chip out especially on the bottom and you'll get tear out and splintering on the bottom of your plywood so if you take blue tape and you put it exactly where your cut's going to be so that you're cutting through that blue tape it significantly reduces that tear out and you'll have a much cleaner cut this can also work on the miter saw if you find that it's tearing out a lot too another thing you can do to reduce tear out on your miter saw is you can put a temporary backer board and baseboard on your saw so that when you cut through it you cut through those backer boards as well and that makes it so you have a nice clean zero clearance edge and a nice clean cut if you don't have time for any of that or like i often do you just forget until you're actually cutting then the best advice i can give you is just slow down take the cut nice and slow not stopping because that'll burn it but slow enough that you get a nice clean edge and you go through that and it won't tear things out since we're talking about tear out i have another tip for that and this is useful for your router table i find i get the most tear out on the router when i'm doing something with a complex router bit like a rail and style bit this happens especially when you're going across the grain because those fibers are going like this and your router bit is going like this so it's trying to pull those fibers and it can tear out the back of your board so the tip for that is to again create a zero clearance insert this means you take another sacrificial board and cut all the way through it with your router bit then when you put your actual piece on to cut through it'll cut through nice and clean and it won't tear out the back of your finished board now this next tip is a table saw tip let's say you're like me and you've survived most of your life without making a cross-cut sled now i'm not proud of this i do plan on making one but just haven't gotten around to it yet so if you're trying to do repeated cuts let's say i have something where i want to cut everything at two inches and i want to cross cut those but it's too small to do on my miter saw i don't want to have my hand in there holding it an inch away from the blade then i use these things called fence clamps this is something from rockler and i think there's other companies that make them too but you put them into a board and you have a short auxiliary fence that's in front of your table saw blade this makes it so you can set your fence to cut whatever length you want then you slide your board over on your miter gauge to that position and cut each piece but because the fence stops before you actually start making the cut you're not concerned about kickback because there's no pinching the wood between the blade and the fence so this gives you a much safer solution and makes it so you can cut all the small pieces that you need to i've used this numerous times on many projects to the point where i have my short little auxiliary fence that i just keep stored like that so i can pull it out tighten it on i'm ready to go now i have another blue tape trick that some of you probably know already but tape can be a great clamp and especially if you're doing miters or something that is going to return and connect to itself blue tape is awesome the way this works is you lay the tape under each joint then you take your miters and you put them almost exactly touching on the tape then continue this by laying out the tape and putting the boards together so they're just barely touching once you get the pieces all connected bend them all around do a dry fit and make sure you don't have any gaps then if you're good to go on all those joints open it back up and put glue on each one then you roll it back up close it put glue and tape on that last joint to connect and make the complete circle and you're good to go here's a tip that you may not think about but it comes in really handy when you're trying to worry about wood expansion in your shop in certain areas of the country we have temperature and humidity swings that are really big it's good to know the temperature and the humidity in your shop throughout the year so you know what times a year things are going to expand and what times a year they're going to contract i just got a cheap temperature and humidity sensor on amazon and i now know the range of the temperature and the humidity in my shop because i come out and i see that every day this next one is one of my favorites that often gets overlooked so listen up we all have tape measures that we put on our belts or on our pockets or on our aprons and most people when they measure something they'll take it off of their apron or take it off their belt go out and measure it hook it back on drop it back in the pocket something like that [Music] but there is another trick with tape measures that's going to blow your mind are you ready leave it connected what don't take it off your belt the tape measure will automatically retract so you pull it out mark whatever you need to mark when you're done with it just let go and it'll go right back to where it should it's a beautiful thing i hope this has given you some ideas to improve the efficiency in your shop i'm also pretty sure that most of you have things you do in your shop that are tips and tricks that we could all benefit from as well so please add those in the comments i'd love to hear your ideas i'd love to hear the things that you guys come up with or that you do in your shop that maybe i hadn't thought of in my shop please comment and read the comments and then we can all learn from the tips and tricks that we all have and we can share them with each other and everybody will get better now go build something and we'll see you next time [Music]


No comments