woodshop classes “+10,000 Step By Step Plans ...even if you don't have a large workshop or expensive tools!“ Click Here 👈 g...
 woodshop classes
“+10,000 Step By Step Plans ...even if you don't have a large workshop or expensive tools!“ Click Here 👈
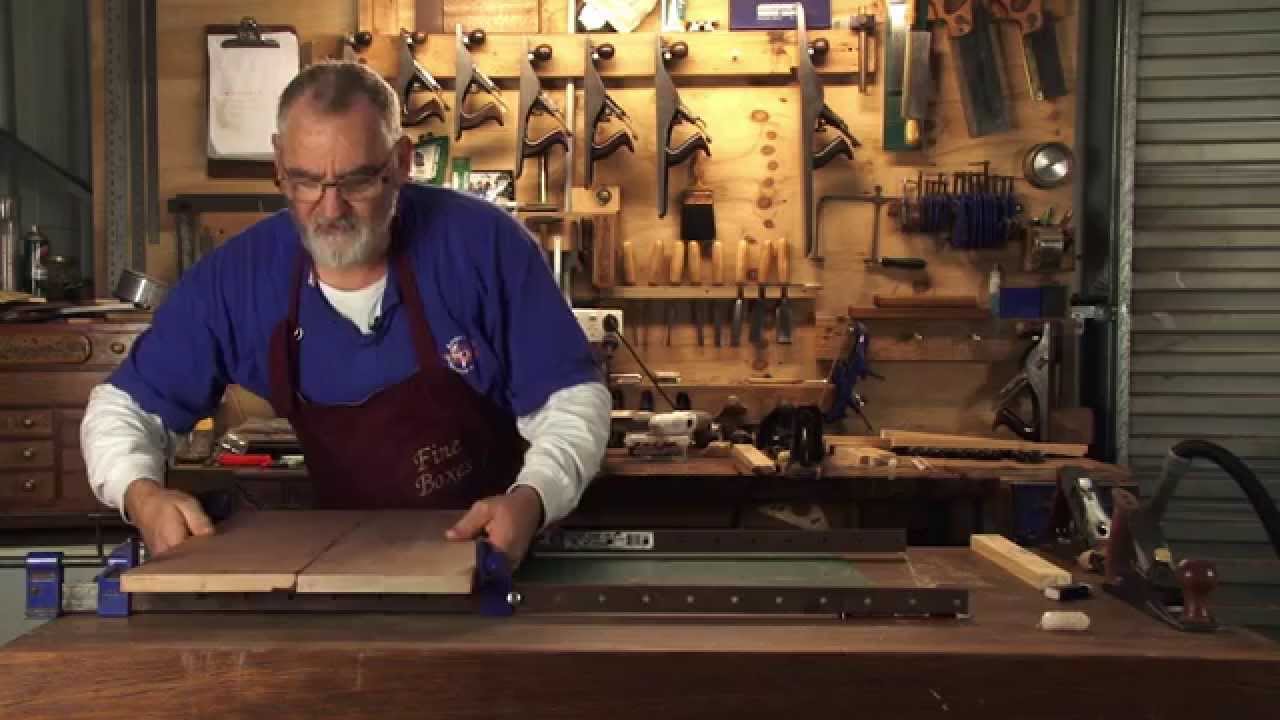
g'day and thanks for joining the woodworking master class today I'm Steve and welcome to my workshop in the coming weeks we're going to turn a pile of rough sawn timber into this beautiful period style side table complete with dovetail drawers and four hand matched cabriole legs and along the way I'll be sharing many tips tricks and techniques that I've learned developed and used for over 30 years as a professional woodworker and finally furniture maker along the way we'll be making some very useful and handy jigs that can be used not only with this project but any other projects you should undertake and your woodworking adventures the reason I chose this particular project is because it has a lot of traditional techniques involved with it even though a lot can be done with machines and power tools it still requires a lot of hand tool usage which creates a wonderful opportunity to learn new skills or home the ones you already have and when broken down into small manageable parts as we'll do it will be even within the reach of the most novice of woodworkers and yet at the same time challenging for those with more experience so if you'd like to join me now will waste no more time and we'll start on the project okay when I start building a piece of furniture it starts out in book form I just doodle on a pad until I get a design that I feel is worthy of being built I then move on to a full sheet of MDF and build or draw the piece I want to build in full size that allows me to get ratios and balance and get a pleasing effect and I've found over time it's a lot easier to rub a line out and draw a new one that have to make a new leg or a new drawer because it doesn't quite suit the design once this is done I take all my measurements from this board now as far as sourcing timber a lot of people nowadays buy their timber pre dressed or called dar which stands for dressed or round the advantage of course with dressed timber is as flats you can see the figure you can see the grain and it's nice and square unfortunately it does have its limitations I much prefer using rough sawn timber the disadvantage is all of you straight away you can't see what the grain or the board is going to look like but the advantages far outweigh the disadvantages for example rough sawn timber is generally cheaper than dress timber also it makes more species available for you because Tim BRS carry a lot more in rough sawn the thing I like as well is timber today or the furniture today is generally built in 1930 quarter-inch whereas antiques and furniture of yesteryear were built in 7/8 or 22 mil so I've got a rough sawn board at 25 I then have the option to either machine it down to 3/4 inch or 19 mil or 22 though another great advantage is if you in storing your timber should drop anything on it it gets stained it gets wet or it gets bruised by the time you've machined it down to the right size all those blemishes would disappear with brest timber that's your finished site and if you gave me blemishes or stains on it you're stuck with them for life or you've got to use another piece of timber but when you're buying rough salón tender don't assume that it is square and flat because in most cases it's not and we have to machine the timber now the first part of machining the timber is to give us a flat surface that we can run through a thickness up now if you're like me and many other woodworkers you have a thickness err and a jointer but the jointer isn't as wide as the thickness er we have a problem because if your board is wider then your figure you joined a table you can't do it on the jointer well you can if you saw it up the middle and then machine it separately and glue it back together but frankly it doesn't look professional in the finished job so the other way is to flatten it by hand and that's what we're going to do work out if it's cupped twisted warped or bent and then flatten one surface so we can put it through the thickness er but before we do that let's make our first workshop aid and it's a very simple one it's called a bench hook very easy to make very easy to use but very very useful all you need is a piece of scrap timber plywood preferably I found this bit in my throw out bin it's cut square roughly a4 size another thing I have a lot of them our workshop is to be one pine now the length of this generally you can pick up for under $2 but make sure you get a nice straight piece and clear so there's no knots or pith in it that way you can use it for a lot of purposes cut some lengths to the width of your pine two lengths so you end up with two pieces like that another thing I have unused a lot in the workshop is 30ml gyproc screws I don't use them for making furniture but they're ideal for just holding things down all we will do square you to be one up to the pine the ply and then three screws in fact two screws it most likely do hook that bit over your bench and repeat the process with the other piece and there you have it your first workshop aid a bench shock and we'll be using it later on now back to flattening timber before we can flatten timber we of course have to work out if needs to be flattened and how do we do that we use what we call winding sticks and if you don't have any winding sticks that's okay we'll make a couple right now get your bench hook you just made get that pine again get a saw and cut roughly a 300 million now go over the table saw or bandsaw and you split that up the middle what I do is mark top on two pieces with arrows pointing to the join that's going to happen when you resaw it and then you end up with two winding sticks how we use these winding sticks get your board the arrows pointing the same way and you sight down the board and as you can see this stick is slightly higher than this stick which means we've got two twists in the board that's what we've got to get out now how I flattened the board and get the twists out is I use three different hand planes there's a scrub plane a converted number four and a shooting plane if you look at the blade on the scrub plane you can see it's very very severe and it removes a lot of stock the converted number four has got a convex blade that I ground myself it's not as savage as a scrub plane but it still removes a lot of stock and then a normal number seven shooting plane so we know where the high spot is or might flip with a piece of pencil and when we come back after the break and put it in the vise and we'll flatten it okay see you after the break welcome back just before the break we made adventures we make some winding sticks we look this in Kimber and we've decided we needed to straighten it and I explain how to use winding sticks now where we know where the twist is we'll machined it out by the way if you ever use the vise and you find that your Timbers slipping use water a couple of squirts of water works miracles fingers people are scared about using water and timber but when you think about it that's how Timbers grown so it should be pretty used to it right now first off I use a scrub plane and I hit the high spots when I think I'll just about got it I'll put the winding sticks back on and sigh it down just a little bit more to go there the advantage of having that extra fatness with rough sawn you can take a bit out okay that's nice and flat so what I do now is go down the entire board using the scrub plane and back again I'll give it one more now that's given me a very severe checkerboard pattern to flatten it out a bit more I'll use what I call the hogging plane which is converted number four same process on the diagonal and then back again that should be nearly good enough to put in the thickness er but I prefer to go over to make sure it's as smooth as I can get it that's why use adjoining plane and you'll notice to start with I'm not taking much off but that's because the plane is riding over the ridges but actually work down and the shaving get stronger and stronger by the way if you ever wanted to join a gym by a couple of hand planes to give yourself a workout half an hour a day best aerobics you can have that now is straight enough I'm flat enough to go into the joinder oh the sorry the thickness er I'll go and put it through right now okay as you can see that board now is parallel with each other both faces but now we've got to get an edge at 90 degree to the two faces and how you do that once again is putting it in the vise and using the jointing plane if you've got a jointer that's fine but you'll still need to use a shooting plane to remove the joining marks before we do that let's just have a look at the grain it's very important that you can read grain if you look here you can see the grain is going uphill it's very much like stroking a cat if you stroke a cap from the head to the tail cats happy it's nice and smooth go from the title of the head kad's not happy and no one has a good time so we've got two splain what they call uphill and that's true when you're using your jointer because the blades are running this way it has to lay the grain down your thickness a same thing only the blades on the top so it has to lay the grain down so we'll put that in a vise and we'll shoot a nice square edge something I find invaluable in the workshop be the candle grease works wonders now when you start to play you'll notice I'm only taking a little bit off the board the reason for that is because the board isn't straight to start with if I'm using a number 4 plane and the board's wobbly that's how the plane is going to do it'll follow its contours so I won't get that crisp nice sharp straight edge I'm looking for but with adjoining plane it crosses all the hills and valleys and I'll give us a straight edge another thing people plane they use their arms a lot that wears you out I like having my body fairly Center to the board that I'm planing and use my body get that out of it my body weight to propel the plane except for the last a little bit where you move my arms you might shine too when you're planing you have a tendency to roll the plane I'm left-handed so I roll the plane towards me which means this side is generally higher than this side if you're left right-handed the opposite is generally true it's how I compensate for that is I put my fingers under the sole of the plane thumb down on the knob grab hold of the Toth point the finger and I take a very small shaving off the high edge if you can see that I'm not doing a full width of the board but that's taking the high spot off as I do continuing shaves eventually I get nice wide shavings then I know the board's flat check it with a square and that's nice and true all right once we shot a board we've got it flat we've got it square unfortunately nowadays we don't have the luxury we used to be able to get wide boards now the top of this side table is nearly 300 mil and it's hard to get boards that wide so we have to join them there are many methods on the market today of joining boards but I prefer the traditional one which is called a sprung joint now a sprung joint when laid two pieces of timber side-by-side puts pressure on the ends I don't know if you've ever seen a table that's been in the weather it's got splits on the ends it's a good chance that it wasn't done with a sprung joint it was either a butt joint was dowel together because wood even though the trees dead is still living when it's wet it expands when it's dry it contracts that's how we get split but after the break I'll show you how to do a strong joint and explain why I believe it's the superior joint to have internet anyway see after both welcome back just before the break with shops and board's restroom and now we're going to join a couple and we're talking about sprung joints and how they work and why I feel there's a superior joint for furniture making as I said before the break timber moves in the wet it expands and in the heat it contracts what happens in the majority of cases when the timber shrinks it draws into itself in that way and in many cases it's stronger than the glue so it will break the glue line and you will get start to get very small splits at the end of your joints with a sprung joint this is exaggerated we plane an ellipse into the boards and then when we clamp them together and glue up we're applying extra pressure to bring these two surfaces together and in doing so we compress the ends of the boards so when it's cool or when it's wet the boards can expand but when it's dry instead of shrinking there's enough compression on the joints to allow the joint to expand and take up the slack and therefore we don't get any splits so how we get a sprung joint is generally again user shooting plane this is a number seven I generally come in about two inches same as before if I'm on the knob fingers underneath grab hold of the tote a normal plane for about the first couple of inches and then I use my body weight to push down on the plane and then before the last couple of inches I release it so if we were to look at a shaving it would be thin then thick then thin again I'll do that one or two times on both boards so I've just got a very narrow dip when we do on the boards together and hold them together we should be able to see light through the middle and that's what we're aiming for if you have a problem planing square to start with here's a little trick providing the grains running the same way remember we're going up we plane uphill put the board's together have the grains run in the same direction and then put a mark so you know where the boards go join them together and if you put them in the vice together making sure they're even there's a little bit higher so we might have to take a bit off of that it doesn't matter now if you roll the plane right or left because whatever you do will be compensated if I lean this way this means the inside the outside board is going to be narrower than the top one which will be higher but when they come together the compensation will allow them to join nice and smoothly now when we clamp that up it's going to join nicely so we might do that right now I use hide glue there are a lot of other glues on the market but hide glue seems to work for me they've been using it for thousands of years and the thing I like about hide glue is I can undo my mistakes and believe me I'll make a lot of them whereas a lot of the other glues nowadays once it's glued together that's it you're stuck with it just put these up got a spring joint in and this will be the top of our table that's the other thing I don't believe you can ever use too much glue I've seen jobs come apart because people haven't put enough glue on it it just means maybe a little extra cleanup with glue squeeze-out thing with hoe glue too is you don't have as much pressure as you do say with PDAs or epoxies because high glue actually glues upon itself and therefore you have to have it not squeezed all the way out or you'll get a very weak joint with high glue I generally leave it overnight before I machine it or clean it up and there you have it no messing around lining slots up the lining holes so easy now that's how we've done the top now we've got to do the sides of the carcass that's slightly different because as you can see they're narrower pieces of wood I don't so much worry about doing the sprung joint on these because not many much moisture can escape because we've got the top on this side and we've got a rail on this side so I just get two bits of timber I've shot them straight and they'll join them together like that which is a butt joint as I say and all the great cooking shows here is when I cooked earlier this is being joined just with a butt joint and you'll notice it's a lot wider than this the reason for that is I'll get both piece is out of the one side it gives me continuity with the timber and when it comes to machining it's much easier to machine if it's a bit wider now playing the straight edge mark that is your face edge get a square find the glasses just mark off a line as close to the edge and we have to plane that flat as I said before larger planes really are a bit cumbersome in this area so what I use is a block plane now the difference between the block plane and the bench plane basically is the bevel is up on the bench plane the bevels down and it's also got a removable mouth or a moveable mouth so you can take very fine shavings so we put this in the vise and we plane down to that light but if you've ever cleaned endgrain before you've notice you'll get tear out on the ends trick with the block plane or any end grain planing put a little mitre on the end of the board that's why I always make my pieces oversize until I've got the exact measurement and then plane it down to the line so it's square and also square this way then mark off the width you need cut down and repeat the process so let's taking care of the sides of the carcass and the top of our table next week we'll be going on to building the carcass itself using ductile constructions and the tools we'll be using will be chisels sores coping saws Japanese saws marking gauges and a lot of other jigs and workshop aids which I'll be looking forward to sharing with you next week really I hope you've enjoyed this path so it's Steve pull on the shed door down for another week and saying remember the favored sharp but more importantly keep it safe by seasons 1 & 2 woodworking masterclass are now available on DVD call 31 digital on Oh seven three oh one oh seven double three one or head over to the woodworking masterclass Facebook page to order grab a copy of woodworking masterclass on DVD and remember to keep it sharp but more importantly keep it safe and enjoy your wood work g'day I'm Steve and I look forward to welcoming you into my workshop for episode two of woodworking masterclass in that episode we'll be building four carcass to this magnificent period sized side table and I'll share with you some tricks and techniques that I've learned to their cutting gulf tiles and also how to have fun with woodwork so until then I look forward to your company on woodworking master plastic ...


No comments