workshop furniture “+10,000 Step By Step Plans ...even if you don't have a large workshop or expensive tools!“ Click Here 👈 ...
 workshop furniture
“+10,000 Step By Step Plans ...even if you don't have a large workshop or expensive tools!“ Click Here 👈
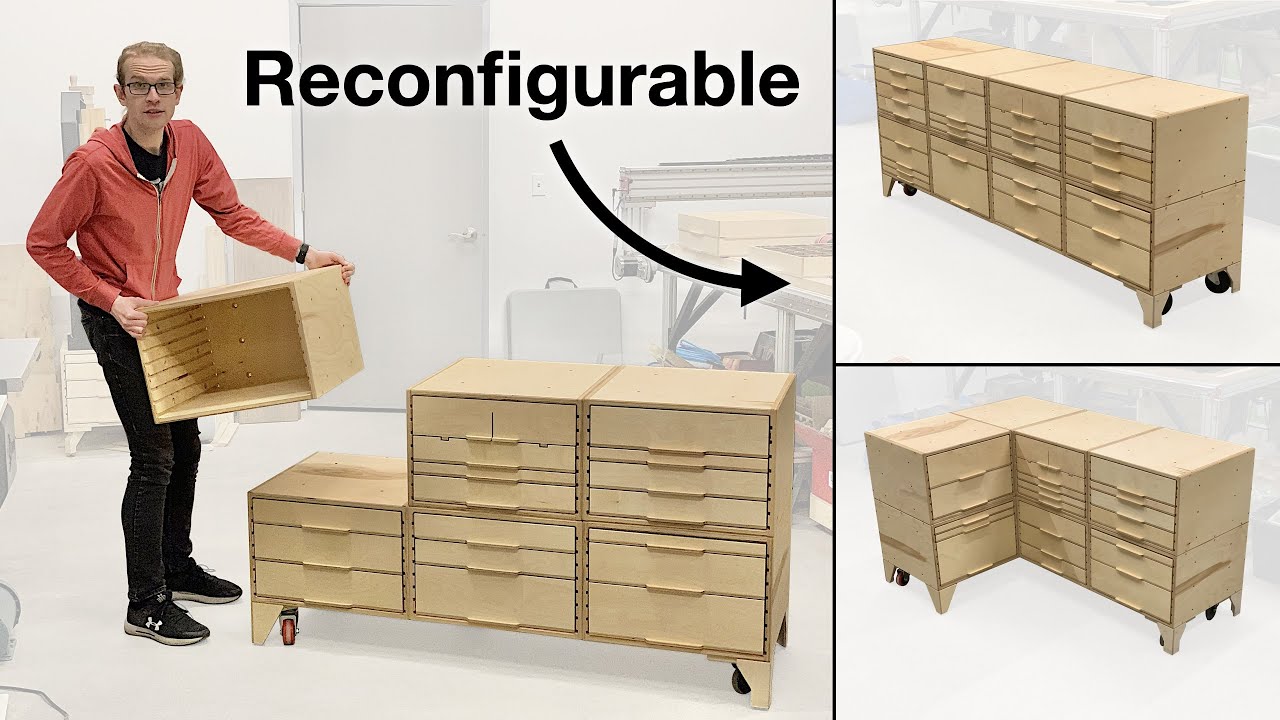
Hello! This is my new shop cabinet system. Back in 2015, I built some drawers for my table saw station that were all interchangeable. And then in 2016 I kind of refined that design and built this giant cabinet that had 45 drawers, again all interchangeable. And then in 2017 I built a cabinet for my belt grinder that also had these interchangeable drawers. And it's kind of been evolving and improving over time. But then a couple years ago I moved across the country, and it just wasn't practical to bring any of those cabinets, so I lost all of my drawers. And that's what made me realize that it would be better if my cabinets were made in smaller pieces that could break apart, so that I could move them more easily. And then I realized, if they're smaller pieces they can be modular, and they can be bolted together in different ways and reconfigured. And that makes it way more practical for me to share the design with other people, because my previous designs have all been really custom to my application, so I couldn't really sell plans for them or anything, even though other people were interested. But now I can, because this is not a custom cabinet that I designed for my shop, this is actually four separate modules that I have bolted together in this configuration, but you could build them and bolt them together in a different configuration to suit your needs. Or maybe as you buy more tools and your shop evolves and grows, you'll find yourself saying "Man, I sure wish I had made my cabinet bigger!" Boom! Just add more modules. I don't need to rebuild anything — just make some more modules and bolt them on. You can even bolt them together into an L shape like this. And this is only possible because the cabinets are square, so they can be rotated 90 degrees and they're still the same size. And also they have the same hole pattern in the back as they do in the side, so they could be bolted together either way. Part of the reason that these handles are as slim as they are is so that they clear here. Stacking up two of the cabinets but making them sit directly on the floor gives you a nice desk height. Stacking up two of them and then putting them on top of some risers and putting a thick top on top of them gives you a good workbench height. Stacking three of them gives you a good standing desk height. Here you see an example of a single cabinet being used as a stand for my bandsaw. And here we're using some single height cabinets as a sort of coffee table in the office. In this video I'm not going to have time to get into table surfaces too much, but I did want to talk about it just a bit, because it was something I put quite a bit of thought into while designing these cabinets. Because what's going to be used as the table surface determines how tall these cabinets need to be. So with the feet that give it a toe kick, that brings this surface up to about 32-1/2 inches, which is roughly 3 to 3-1/2 inches lower than a common work bench height or table saw height. My thinking was that this leaves you enough room to make a really beefy tabletop. So this is kind of my concept for a workbench top: it's four layers of material, so it's 3 inches thick. And then overhanging the top two layers — only the top two — because I still want to be able to open this drawer, even if I have a clamp in place. And if I want a steel table surface, like maybe I'm making a welding table or something, then I also want to have some room so that I can make a square tube structure and then use a plate steel for the top. I am also not going to have time to go into the feet in too much depth, but you can see that all of the cabinets have this four bolt pattern in each corner for bolting on feet. Here I have a caster foot, which looks like this. This surface is there for putting a shim under. That's the simplest way I could come up with to immobilize the cabinet without any kind of moving parts. I'm probably going to design a more complicated mechanism for raising and lowering the caster, but for now I wanted to start simple. This is a simple leveling foot, and since this is a four bolt square pattern, this can actually be indexed to four different orientations. So in this orientation, that's going to provide me maximum stability to keep the cabinet from tipping. But if I put it in this orientation, that provides me the most toe kick. Anyway, again, not going to go into too much depth. I'll probably talk about these in a future video, and maybe more feet also. Oh and you can of course leave these off altogether, and just let the cabinet sit directly on the floor, and that will give you a good desk height. The inside of all of the drawers is 375 by 450 millimeters, so you can fill them perfectly with 75 millimeter square boxes. I also want to try to do some interesting stuff with the drawers. Right now I don't have a lot of examples of that, but I do have one. This is not a drawer. This is my table saw crosscut sled. I could probably spend an hour talking about the design. There's so much thought that went into every dimension, and like everything has a purpose. And I want to talk about that stuff, but this video is going to get way too long if I do. So I'm gonna make a separate video where I just nerd out about the design, and also answer a lot of the most frequent questions from the comments of this video. So stay tuned for that maybe in a week or two. For now, let's get started on building this stuff. So I designed this so that you can cut the parts for two cabinets out of one 5x5 sheet, with just a little bit of scrap. So I bought a 5x5 sheet. You can get it cut to haul here, which makes it narrow enough that it fits easily even in the tiniest of cars. So for building two cabinets, I have four sides, four tops / bottoms, and two backs. I cut all of these oversized for now, so they're all a couple millimeters over, because it's really hard to be precise when you're just breaking down a big sheet. So I need to go ahead and trim some of the dimensions to final size. For now I'm going to leave the sides oversized — they're actually going to stay oversized until the whole cabinet is glued up, and then I'll trim off the excess. The tops and bottoms need to be trimmed down to final width, but they're also going to stay over length until the end of the build. And then the backs need to be trimmed to final dimensions in both directions. I want to be really precise about the width, so you'll notice I'm cleaning off any dust along the fence or along the edge of my work piece to be sure that that doesn't skew the cut. I'm also flipping some of these pieces over, because some of them had one rough edge and one smooth edge, so I'm running the smooth edge against the fence to clean up the rough edge. Here I'm mocking up the cabinet to decide in which orientation I want each of the pieces. So you see me kind of flipping them around and looking at all sides — I'm just trying to decide which way I want them. For example on this part there's some saw blade marks, so I want to put those to the back where they'll get cut off later. The orientation of these parts can be completely arbitrary, but I still want to mark them, because I'll be referencing those marks in the upcoming steps. Here I'm marking the locations of all the holes that will hold the feet on, as well as the holes that will connect various cabinets together. And then I'm also marking the locations of screws that will be used to assemble these cabinets. The corner that I marked as the outside-front-bottom is my reference corner, so all of my measurements are coming off of these two surfaces. I start drilling all of the holes by drilling a 2 millimeter pilot hole. And then starting from the face that I marked as the outside of the cabinet, I'm drilling a 3/8 inch hole just about halfway through the plywood. And then I flip the parts over and drill with a 3/4 inch forstner bit from the inside face. This is the best technique I've found so far for getting a really nice concentric hole and counterbore. For setting the depth of that counterbore, I just drilled into a strip that's narrower than the width of the bit, and that way I can measure how much is left. Because how much is left matters more than how deep the bore is. Here I'm switching over to my dado blade to cut the slots for the drawers. But note that you do NOT need a dado blade to do this — I will show you later in the video how to do the same thing just using a router. I am ready to cut all of my slots, but since this blade is about 8 millimeters wider than my normal blade, I can't trust my fence scale, because it would be about 8 millimeters off. So I'm using the ruler to set up the fence. And when making these cuts I need to make sure that I have the outside facing up so that I'm cutting on the inside, and also check my reference marks to be sure that I'm referencing off of the bottom edge. After each cut, and before moving the fence, I am going along each of these with this little jig. It's just a block of wood with a screw sticking out by a very specific amount. You could just use a pair of calipers to measure the depth of the slots, but the block of wood is faster and it leaves this scratch mark in the bottom of the slot, so you can see where your slot is too shallow. If there is a spot that's too shallow, then I need to just run that back over the blade, making sure to put pressure over it to be sure it's cut to full depth. If the slots aren't full depth, then the drawers might bind in the finished cabinet. Pass Pass And pass. Now that all of them have passed the depth test, I can move the fence over and start on the next set of slots. Done. I know some of you all don't have a dado blade, or maybe you even have a table saw that can't take one. Don't worry, I got you. You can use a router instead. So I'm going to show you now how to do it with a router. First I'm just referencing my plans and marking out where the slots will go. And then clamping down a fence, offsetting it from my marks by the correct amount for my router base. Now right here you notice me putting a shim between the fence and the router. The thickness of this shim plus the diameter of my router bit is 10 millimeters, which is the width of the slot. So I make the first pass with that shim to establish the far edge of the slot, and after cleaning up the dust from that pass, I can make another pass without the shim — so now the router is running directly against the fence — and will widen that slot out to 10 millimeters. The first cut leaves a bit of a fuzzy edge, so I'm using the shim again to make a cleanup pass in the reverse direction. Let's see that again from a different angle. Here I'm using the shim making that first pass. Then I clean up the dust, make the second pass without the shim, going in the same direction. Clean up everything again, and then make that third pass in the reverse direction, with the shim. And that's it. And then I'm checking the width to be sure that I got the right width all the way. With the table saw, it was easy to get the width right but easy to get the depth wrong. With the router it's kind of the other way around — it's easy for the width to end up a little too narrow or too wide, but the depth is almost certainly going to be right. It's probably worth getting a 10 millimeter diameter bit for this if you don't already have one, because that way you shouldn't need to make multiple passes. This step is optional, but I'm just lightly chamfering the edges of the slots. It only takes a few seconds per slot, and it makes it a lot easier when I'm finishing it later, because it's not splintery so it won't snag on the rag. Now all of the parts are done, so I'm dry assembling them. Checking my marks to be sure that I'm putting pieces in the right orientation. I want to position the back this way. Now, if you'll remember, we cut the top and bottom oversized earlier, and they're still oversized. So they're going to overhang a little bit here and I'll trim that off later. For now what matters is that we get the depth from the back here to the front here right. If this is too deep or too shallow, then the drawers are not going to close to be flush with the front. So I'm going to measure from the inside of here, and make sure that this is the right distance. I don't have this clamp very tight, so I can still easily move it with a mallet. So I want to check my mark here to be sure that I'm putting the right side on the right side. I need to make sure that this is flush across the front, and then this needs a 2 millimeter offset on the bottom. Now I could measure that, but the thing is, this distance is 22 millimeters, so that means there will also be a 2 millimeter offset on the inside here, since this is 18. So I can just center this, and I'm just going to eyeball that. Do the same on the back. So, again, this is the right side, this is the bottom. We need this to be flush across the front, and then this part centered on this. Just eyeballing this should be good enough. And then we can do the same thing looking from the back of the cabinet, except this probably isn't going to be flush because both this and this are just rough cut, but make sure it's centered side to side in the same way. Here I'm lining up the front edge of the top with the front edge of the side to make sure that those are flush, and then I can screw the back on. Since the side was cut with the table saw, these two edges should be nice and parallel. So in order to get the top and bottom parallel, I'm just going to go along here and make sure that I have an equal offset all the way. And then I just repeat the exact same steps for the second side. Now I'm disassembling this, and I'm going to apply glue to all the surfaces and reassemble it. Here again I'm checking my marks to be sure that I'm putting the back on in the right way — it's easy to get this upside down. And I have squeeze-out all the way along. That's what you want to see. Since we already dry assembled this with the screws, I don't need to measure anything this time, because the screws will automatically align it back the way it was. That's ultimately why I did the dry assembly — it saves you time when you actually have glue on it, because you already did the alignment. I like to tighten each screw a little bit at a time, so they're all driven in to get the alignment right before they're tightened down. I scraped off most of the glue squeeze-out with a chisel, and then using a flush trim bit in the router I can trim the overhanging parts flush. So just to show you one thing that you might run into: if you adjust your router bit too low, the bearing can run into these holes that are for mounting the feet, and that will gouge the side of the cabinet then. So you want to adjust the router up, so that bearing will go between the hole and this overhanging edge. And then here I need to be careful to stop before the bearing drops into that drawer slot. And then I'm using a 3/16 inch radius round over bit to ease all of the edges. What I'm doing here is super optional, and I actually don't recommend doing it, because it takes forever. I'm just drilling out all of the places where the screws were, and I'm putting dowels instead. I thought that this would look better and so I did it on my original set of cabinets, and now I have to do them all the same to make them look the same. It actually doesn't look that much better though, and it doesn't really add any strength, it just takes a lot of time. I finished all of my cabinets with one coat of wipe-on poly. Here's a comparison to show how much different it looks with the finish. And with that, we're ready to start on the drawers. So here again, I designed it so that nine bottoms fit on a 5x5 sheet with almost no scrap, and just enough room that you can cut to haul between them. And of course you can use a 4x8 sheet if you need — to I just didn't optimize for that. In this case I'm only going to be making five drawers, so I'm gonna make six bottoms out of this — that'll leave me an extra for later — and I'll make all of the sides and fronts and backs out of this. After breaking down the sheet into individual drawer bottoms, here I'm skimming the edges of each piece to bring it down to final width. And I'm putting a 1/16 inch round over, just along the sides. This is easier to do now than it will be to do once the drawer is assembled. So I'll be making five drawers here: the top one is going to be just 1 slide-depth, and then this one's 3 slide-depths, this one's 4 slide-depths, this one is 2 slide-depths, and then this monster is going to be 6 slide-depths, which is about 22 centimeters or 9 inches. And I already cut a few of the walls, just because I had some scrap to use up, but next up we'll cut all the rest of the walls. Here I'm cutting the sheet across the grain to the length that I want the walls to be. And then here I'm cutting those along the grain into the height that I need. That 1/3 of one sheet didn't end up being enough to make all of the walls, so I used up some scrap to make some of them. So here I have all of the sides and all of the backs, and I want to put a round over on the top edges of each of these. Again it's just easier to do it now than it will be after it's assembled. This is the stack of drawer bottoms, and I'm marking where I need to put nails when I assemble this. Okay, we're ready to glue up the drawer. Rather than just positioning all of these sides and trying to get them all in the right spot on their own, it's easier if you build a jig. This jig looks a little bit crazy, um ignore all of the stuff going on on the inside — that's just because it's made out of scrap wood. All that matters is these outside edges. So the purpose of this jig is to give us a form that we can build the box around. This establishes the exact right inside dimensions, so you don't have to measure anything. It also makes sure that the box ends up square, and it makes sure that all of the sides of the box end up straight up and down, and not angled inward or outward at all. It also gives us a flat surface to clamp all of the sides against, so if the sides are bowed a little bit we can clamp that bow out of them. Make sure the jig isn't twisted. If it rocks on a table a little bit, that's going to make your drawers end up rocking on the table, so you need to make sure it's flat. Second, you need to make sure that these edges are straight up and down — perpendicular to the base. If they're angled inward a little bit, then the side of the drawer are going to end up angled inward, and that will prevent you from lifting the jig out of the drawer when you're done. I made my jig just short enough that I could cut this on the table saw, so that's how I got it square and got the edges parallel. These bottom edges are chamfered slightly — that's to prevent the glue squeeze-out from getting on the jig, because that could stick the jig in the drawer. And finally, you need some relief on these corners, so it should just be cut back about 2 inches. Now I did kind of a complicated shape here, because I forgot to not put nails in this corner. Ultimately you can just cut this off at 45 degrees, and it'll be way simpler. The purpose of that relief is so that if this one is a little bit too short, you'll be able to just bend the side in to make it touch here, so you can still glue it up. If this corner was a sharp corner, then even if this piece was just 1/10 of a millimeter too short, you're not going to be able to close that gap. This also of course provides some clearance for glue squeeze-out, and it also provides some clearance in case you aim one of the nails badly and it comes out this side — it won't nail the jig in place. Here I'm positioning the jig on the drawer bottom. It just needs to be centered side to side, and perfectly parallel to the edge of the drawer, and then approximately the right distance from the back. The drawer bottom is still slightly over length right now — that's why the front to back position doesn't need to be perfect. The drawer front is also over length, so it doesn't need to be perfectly positioned side to side; I'm just eyeballing that. And then I like to clamp the walls onto the bottom, just to get that seam a little bit tighter. Of course you could just clamp it and not bother nailing it, because the nails aren't really going to add any strength once the glue is dry anyway, but the nails allow you to take the clamps off immediately. Oh and by the way, I should mention that the plans include instructions for how to make this drawer jig. So of course you can just make it out of scrap wood however you want, but if you don't want to figure it out on your own, the plans do tell you how. So this jig only establishes the inside dimensions of the main drawer box, so for positioning this I just have a couple of spacers. I chamfered the edges of these so the glue squeeze-out wouldn't stick, but you don't really even need to do that. I guess if you haven't seen me build drawers before you might be wondering why there are two backs. The false back — the one that's closer to the front of the drawer — serves as sort of a visual stop line to tell you to stop pulling the drawer, because you're about to pull it all the way out. And it also keeps all of your stuff in the front part of the drawer where it's actually accessible. I'll talk more about this concept in the "nerd-out" video coming up. You can see how I'm being pretty careful while putting this piece in, because there's glue on so many different surfaces it's easy to smear the glue all over and make a mess. And that's it, that's all there is to gluing up a drawer box. Here I'm starting on gluing up the big deep drawer, so you can see how I've made some spacers so that I can still get the sides behind the clamps. Since this drawer is so deep, the jig is not supporting the side along its full height, so I'm eyeballing along this edge to make sure it's parallel to the front. And here I'm doing the same thing for the false back, to make sure that it's not angled inward, trapping the jig in place. I'm just using these spreader clamps as handles to be able to pull on the jig. Off camera, I assembled all the rest of the drawers in the same way. Now they are functional like this, but they're kind of ugly, and the handle is pretty uncomfortable, so let's do some more work to refine them. Here I'm marking the center of each drawer bottom, where the handle is going to go, and here I'm using my drawer handle template to mark where the ends of the handle will come to. And then I'm just removing the bulk of that overhanging material, just to save myself some work with the router later. Here I'm showing doing it with the bandsaw, but you can also do it with a jigsaw, or you can also totally just skip this step and cut it all off with the router — that works fine too. Now clamping that drawer handle template back in place. And then there are these two more templates that go on the sides, and I'm using this piece of 1/2 inch MDF to position those consistently. So that creates a nice rounded handle, and it also trims back the end of the drawer slide so it's less visible from the outside of the cabinet. There's still an overhang here, so let's trim that off next. There's space for the bearing of the flush trim bit here, because of that last operation where we trimmed the slide back. There are also some overhanging edges at the back of the drawer, so these templates just give the router a flat place to sit, but I'm also trimming off part of the template, and you'll see why in the next step. So I've left those templates in place, and here I'm trimming off the bottom of the drawer flush to the back. Those templates — being trimmed flush to the back — essentially extend the back so that the flush-trim bit has somewhere to ride all the way to the end. This is that 1/16 inch round over bit again, and I'm just going over all of the edges that aren't already rounded over. For this edge on the top side of the handle, I can just use the handle template to hold the router level while I route that. Next I want to create this shallow cove in the bottom of the handle. This makes it waaay easier to open the drawer. For that I use this 3/4 inch diameter round nose router bit, set to about 2.5 millimeters or 1/10 of an inch deep. And then I'm simply running the router along a fence, and I'm just eyeballing the ends of the slot. They just need to stop before they come all the way out the end of the handle. This paste wax will help the drawer slide much easier. So I generally try not to make promises about future projects, because I've been burned by that in the past, but you can expect to see at least some more videos about this system. I intend to build a stand for my lathe, which has been under this blanket for well over a year now. I also want to build a cart for this welder, using the cabinets, which should be kind of interesting. The lathe stand will be pretty straightforward. I also wanted to just quickly give you a look at the plans. This is the cabinet plans — these are 19 pages — and then I also have the drawer plans, which are 17 pages. You've got a materials list and a tools list, a little drawing to help you get familiar with what I call the parts, and then step-by-step instructions that are super detailed and lots of renderings. All the dimensions you need, step-by-step instructions for how to assemble everything, some finishing touches, how to attach the cabinets together, you get the idea. So if you're interested in the plans and you want to make some of these cabinets for yourself, there's a link in the description to where you can buy the plans, and if not, that's totally cool too. I hope you enjoyed the video either way, and thank you for watching. ...


No comments