router wood “+10,000 Step By Step Plans ...even if you don't have a large workshop or expensive tools!“ Click Here 👈 as a b...
 router wood
“+10,000 Step By Step Plans ...even if you don't have a large workshop or expensive tools!“ Click Here 👈
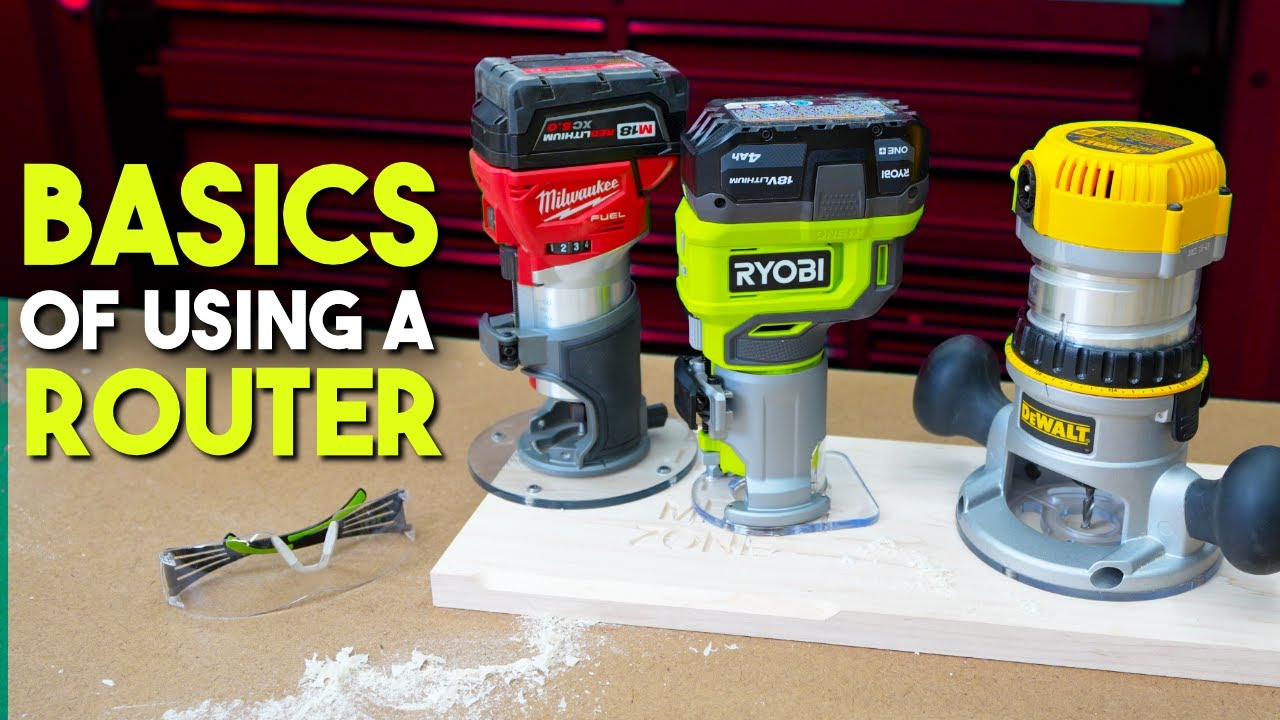
as a beginner woodworker it can be confusing and sometimes a little scary on figuring out which router to use and how to use them properly in this video we're going to go over everything you need to know about routers for beginner woodworker let's go routers are some of the most versatile Tools in a wood shop it's probably one of my most used tools in the shop I use one of these several times a week for various tasks you can cut grooves in Wood very easily and very accurately with a router like you see here whether that be a straight groove or a dovetail Groove for different purposes and you can do what is the most common use for most routers or edge profiles in other words dressing up the edge every woodworking project so that it looks more professional there's some dangers involved in using a router we're going to cover that so you feel more comfortable and safer while you do it but first which router do you pick there's so many out there so many options how do you know which one's right for you there's basically two different kinds of routers you're going to be looking at a fixed base or a plunge base sometimes you can get a combo fixed and plunge base which I'd actually recommend for most people but I've got some recommendations near the end of the video for both bits accessories and routers for the most part if you pick up a small router these are called trim or Palm routers both mean the same thing these are small routers that typically go with your battery platform or like this Makita here which I really like it's a very affordable smaller router most of these are fixed base while some of them you can get plunge bases with them you're most likely going to buy them as a fixed base and all fixed base means is it doesn't have a fast plunging option like this does in other words you set it and forget it and just use it like that now plunge base can be useful for various tasks if you're just wanting to make several shallow passes at different depths you can set this up to do that the way a plunge based router will it has this depth stop that is completely adjustable if this is the high setting we're going to go we're going to back this off and we want to turn this little dial to the highest setting from there we're going to lock this little pin on the side end and then that's going to give us our high setting this is as high as we can go so now every time we turn this dial that gives us a quarter inch drop there's a positive stop there too that allows me to plunge one quarter inch I can turn it again I can plunge another quarter turn it one more time and I can again go all the way to the bottom or through the material however I need to set that so what I would do is set this high setting where this bit is just touching the surface of the wood I'm going to cut that way every time I turn that we're going deeper and deeper similar to what I did when I put this play button in the middle of this workbench I was able to cut that pocket out for that play button to go in just by taking small shallow passes that prevents tear out it makes it easier on your router bit and it just cuts better now if you're needing to do fine micro adjustments to make sure you're not going too deep you're going to use this setting here with the little Flathead screw this allows you to dial in the perfect depth that you need then I also use the plunge base to surface this so that it's perfectly flat with the rest of the table and a lot of people use plunge bases to surface wood or flatten slabs things like that there's a multitude of uses for a plunge base but you can do some similar things with a fixed space it just depends on your use case and what you're going to be using them for one thing I absolutely recommend no matter which router you go with is get a variable speed because speed matters and we'll talk about that when we get into the bits a variable speed lets you turn down the speed that the bit is spinning and you're going to want to make sure the router you're picking has that most routers do but some like this Robbie that I have are not variable speed it's just a fixed speed that works okay for edge profiles but when we get into the bigger bits you're going to want to speed those down a little bit nearly all of these routers have the option for an edge guide some of them come with Edge guides Edge guides are probably one of the more useful tools that you can add to the router I would highly recommend if you have the budget in it doesn't come with the router already go ahead and add that to your cart you'll use it all the time that's going to help you create grooves and things that are offset from The Edge it's going to keep you parallel to that edge I use mine all the time one thing a lot of beginners get confused on is what direction do you route in if you think about a router bit similar to a table saw blade or any blade really the blade is spinning and cutting the wood because you're feeding the board into the teeth of that blade a router bit is not that much different as it has blades on it no matter what style bit you're using it's wanting to cut that wood so you see when this one is spinning you want to feed that board into the bit in most cases on this board for instance we're going to be moving from left to right and you're going to be pushing the router into the wood you'll feel the resistance there it's wanting to go back the opposite direction because it's spinning that way it's like a tire on your car pushing your car down the road this is very similar to that it's wanting to push the router back to the left in this instant you're just going to put a little Force into it hold it nice and snug and you're going to get a nice clean cut in most cases and I say in most cases because if the bit is chopping away at the wood and you see that wood grain right there are leading out to the edge sometimes that bit will hang in that wood grain and tear that wood or split the wood especially like this it'll likely split that from there all the way to the end and the way you prevent that is go the opposite direction I just told you not to go it's called a climb cut you're going to give up a little bit of control because it's wanting to go that way but you can certainly control it on edge profiles chamfers round overs things like that so you'll just go with that edge that'll prevent that tear out from happening so in your routing trays boxes cutting boards anything like that you're going around the outside you're going to counterclockwise around that piece on the outside now when you transition to the inside and you want to put a round over there you're going the opposite direction because that bit is contacting the wood at the opposite side then you would just go in a clockwise Direction that's still the push cut as they call it and not the climb cut which it's wanting to go inside clockwise outside counterclockwise basically what you need to remember there's some common bits that most every woodworker is going to have in their shot and they are chamfer bit usually a 45 degree chamfer in other words it's going to put a 45 degree angle on your board there's also round over bits I think an eighth and a 3 8 are two good ones to have in the shop we'll talk about the difference in a minute I personally love a dovetail bit because I make jigs with those light my tapering and jointing jig and my cross cut slit these are just handy to half flush trim bits are some of the most used common bits in most shots what a flush trim does is create two identical pieces because that ball bearing rides on the sample piece or the template piece then you can use those on templates as well as just cleaning up the edge of work now template cutting with these bearings lets you do several things you can use jigs like this to create radiuses on the edges of boards using that flush trim or you can go ahead and make the same thing over and over so if you're just making charcuterie boards you could just use a template to do that and make the same pattern over and over again one of the great things about those trim bit and then straight bits help you do different various tasks like cutting the dados or the grooves in this top where I put the t-track in or cutting slots and things like that in boards straight bits are awesome for that most all of your routers are going to have some type of adjustment this is a fixed space router and the way it adjusts the height is this ring twists up and down and it allows you to kind of micro adjust that different routers are going to work different ways like this Milwaukee it has this little thumb knob that is gear driven and it allows it to raise and lower the bit when you're setting up your edge profile bits like your round overs and your chamfers the way I like to set mine up is you see how the bit is sticking all the way past this base then I just use this ring or the dial just to dial that up until you no longer see the flat edge of that bit right there once that's past the base you can lock that in and make your cut should come out nice and clean I always recommend using especially if you're a beginner just use a scrap piece to make sure that's going to come out correctly what happens if it's not set correctly if it's lower sticking past the base too much you're going to wind up getting that nice little flat Edge there and it's not going to look that great unless that's the look you're going on for if you wanted a nice clean look like this chamfer bit is set correctly here on the right it's incorrect on the left you can see that ledge this is a nice smooth edge same thing is going to happen with a round over bit it's going to create that ledge sometimes you want that look depending on what you're doing but for the most part you don't now the difference between an eighth and a 3 8 inch round over is subtle but it is useful in certain situations like this you get to our tray we make here at 731 this bottom Edge is a 3 8 inch round over this top Edge is a 3 8 inch round over however the Inside Edge is a 1 8 inch round over it may be hard to see on video it is subtle but there is a difference there 3 8 is just a little bit more of a round over radius than an eighth but it is useful for in various applications depending on how much round over you want hey it's future Outlaw past Outlaws wrong and I'm here to correct him I told you that this was a 3 8 and this was an eighth inch round over that is incorrect and I'm here to fix myself what these are our 8th and 1 16 inch bit kits you can see the kind of a minor difference there and this is a 1 8 and a 1 16 inch round over a 3 8 inch round over is much more significant than the 1 8 as you can see here back to past Outlaw now when installing your router bit what I like to do is leave about a quarter inch or a little maybe quarter to a half inch sticking out of the router itself and then when you tighten that down some of these routers have a push button that locks this in place then you can take the wrench and loosen and tighten that nut some routers use two wrenches one to hold this spinny thing for moving and another to loosen and tighten the nut router bits usually come in two different sizes quarter inch and half inch shank now it depends on which router you have as to which one of these options you will pick now if you have a half inch I recommend getting half inch bits anytime you can but a lot of these trim routers only accept quarter inch and not half however similar to this DeWalt it has a both a half and a quarter inch collet is what they call where it accepts the bit is the collet that have both half and quarter inch so you can use either now When selecting router bits to your shop it depends on the budget you have my personal favorite is white side I buy those bits myself and use them all the time they last a long time they're well made with high quality materials this is a nice set for about a hundred bucks and these last a very long time I use them all the time that is a very good beginner set for most people now before I get into the accessories I think they're very useful to have with routers let's talk about what router is best for you and your shop first and foremost if you're in a battery platform it's very convenient to go ahead and pick up the router of your choice for most beginners if you're on a budget and you just need a router because you want to put round overs chamfers edge profiles on your work this little Makita one horsepower Colt is an awesome little router it's variable speed has good power to it it's going to last you a long time I love the soul router however if you're already in a battery platform a good trim or Palm router in that platform is going to be what you want to look for just make sure you get the brushless line and that is variable speed brushless motors on these cordless tools will give you more battery life and more power by far my number one pick for most Woodworkers starting out is something like this DeWalt if you have about a 200 budget you get a plunge and a fixed base and it's a very powerful router that's going to do most anything you're going to want to do with the router it's a little bit bigger so edge profiles aren't as easy to do with a trim router but but it will still do them and do them well there's also a Bosch model that's under 200 for the most part that has both the plunge and the fixed I used it in my router table it's about the same horsepower I think these are both two and a quarter horsepower they're both excellent routers and will last you for years to come either one of those depending on your color choice or brand choice would work great for you I'll link to both of those in the description and the pin comments so you can find them easier now why would you want a router table in your shop well a router table opens up a whole new world of things you can do with the router this is a skill router and router table combo recently reviewed on the channel you can go check that video out I'll link it up there I think now you can go check that out after this video this is a really nice router table for beginners about 200 or under depending on the sale a few things a router table allows you to do number one small parts like these boxes trays things like that are much easier to put that edge profile on there because you got that flat surface to work on you're going to get a nice consistent round over or edge profile on cutting boards any kind of boards or anything you're making like that picture frame stuff like that it's a really nice way to do that you can also set up stop blocks for different things like making grooves or slots in Wood like you see here it's just a really nice way to do things or you can just cut 90 degree grooves across boards using a little push stick or a miter gauge or anything like that also cutting out templates and things are much easier on the router table you also get better dust collection on the router table versus what you get on a handheld router all in all if you have the budget for a nice router table and router combo These are nice to have if you like this video there's five router bits every beginner should start with click that box to watch that click in the Box you can use the big old virtual fist bump or check got this beginner router and router table combo review right there ...


No comments