woodworking jig “+10,000 Step By Step Plans ...even if you don't have a large workshop or expensive tools!“ Click Here 👈 t...
 woodworking jig
“+10,000 Step By Step Plans ...even if you don't have a large workshop or expensive tools!“ Click Here 👈
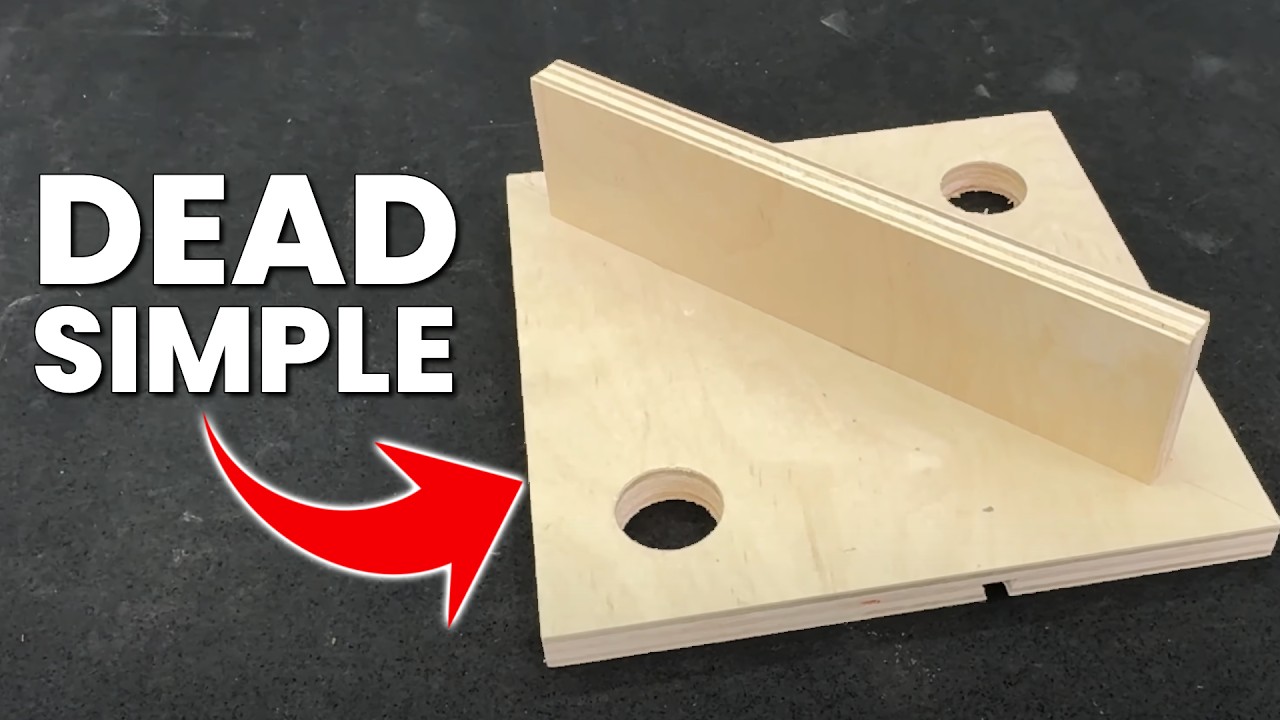
these are the must-have jigs every woodworker should have in their shop in my opinion some of these are so stupid simple two pieces of plywood a couple holes let's go first on the list has to be the Crosscut sled the most accurate jig for my shop cutting 90° Cuts is this cross cut sled I use it all the time this is a very simple jig to make this is my iteration has handles on it it's called a safer Crosscut sled first thing you're going to do is cut too 3 and 1/2 in pieces and glue those together this is 3/4 in plywood that you're using make sure it's flat straight plywood a decent grade of plywood is recommended here but you can find those at your local home store it's usually called sanded Birch or something like that now once you get those two pieces glued up you're going to leave those to the side and you're going to work on the base the base is literally whatever size tabletop you have on your table saw so for me I made mine to fit the saw stop but you can make these for the job site saws as well just depends on your tabletop size just make it close to that tabletop size it should be good to go from there you're just going to cut out a couple of strips that fit in the te- slots of your table saw so most of them are about 3/4 in wide but you want to make sure those fit it's best to use hardwood here or the uhmw plastic that you can buy online as well I use hardwood for mine all you have to do is set those in your taable saw slots put a little CA glue or fast drying glue and then set your ply wood on top of it that's going to match or marry those two together and from there you can pre-drill and screw those Runners into the Bas to secure it just make sure you don't use screws that are too long so it doesn't break the top once you have those attached you're just going to cut a slot raise the blade up through there and cut a slot in this plywood now don't rip all the way to each end or you just cut two pieces of plywood in half and you don't have a sled you just got two pieces of plywood before I attached the fence I took a chamfer bit and I went ahead and put a small chamfer on the bottom that way on the bottom inside that way that you don't get any wood duster chips that clock up the area there I just use a frame and square to kind of get this close we're fixing to square this up using the 5 cut method but to get it close that's really all you need to do just get it close on the right side I went ahead and put a screw in to attach this permanently but on the left side I'm just using a quick clamp to hold it in place once you get it pretty close using the clamp just went ahead and attached that with the screw now on my system after I had the fence done and the slot cut I went ahead and removed this fence before I got it perfectly square and I cut these dovetail slots in there what's that's going to do is let me use these dovetail clamps that way I will be able to hold small parts as well as have a miter fence that I can add to this sled using the dovetail Hardware you want to put these dovet tail grooves in before you attach the fence so that you can get them to the right spot that's why it's important to Mark where the fence was before you take it off on this sled I added the mounts for the handles and then I cut off any excess from the back that I didn't think was necessary it's going to reduce the weight and it's just going to make it a little more usable then I went ahead and attached this Back Fence that's going to give it a place to hold the two pieces together when you cut the thing in half and what's holding this together is The Back Fence and the fence closest to you that way you don't just have two pieces of plywood flopping around now I'm going to use the five cut method to get this fence as Square as humanly possible in my workshop anyway all you do here is you're taking a piece of scrap wood that's 10 or 12 Ines square-ish and then you're just going to start making cuts and you're going to rotate it a quarter turn every cut for four cuts on the fifth cut when you rotated that quarter turn you're going to basically cut a slice off of this piece of wood you'll measure both ends and see how far out of square you are and there's a 5 cup method calculator that I'll drop in the description that tells you your tolerance and which way you need to move things in this instance mine was 02 in out so I use a fer gauge to move this 02 and that dialed it right in do the five cup method again just to double check things and once it's as close as you think you'll ever need it it's good it's good once I got this one died in it was 0.7 of an inch square that's close enough for me from there I'm just going to use screws on the bottom side to lock this in place to ensure that it never moves now all left to complete this was to mount the handles as well as put in the TR trck on top of the fence standard T trck standard 3/4 in wide slot this gives me a place to use a stop block now once this is built I literally never have to build it again like it's just I've had this for well over a year maybe a couple years and it's just an essential part of the wood shop that I think every woodworker should have in their Shop link below to the full build video if you want to build one for yourself as well as plans available for this project next on the list I think every wood shops that have especially if you don't have a jointer or if you're building tapered legs is this it's just a small piece of plywood this is one of the simplest jigs you're going to build again I'm using the matchfit system because it works so well and because I use it on my Crosscut sled I can use it on this and it just makes everything much easier and more cost effective to keep using the same system this is again this is 3/4 in plywood you can literally build all of these jigs out of the same sheet of plywood cut this about 3 four 5T long whatever you want this one's 3T long this works well for my table saw all you do is take your dovet tail bit and route down this length of this about 2 inches from the end and then from there you'll just divide out five of these dovet tail grooves to go across the grain this allows you to Joint the edges of boards and cut tapers if you need to do that and it's using the match fit system so everything's nice and secure in there you want to be careful not let the clamp stick out the edge of this because of the way it rides close to that blade you don't want to hit the blade with one of those clamps it'll damage your blade but under normal circumstances just using it as a jointer which most people will do just Edge jointing boards this works awesome I didn't put a runner on the bottom of mine to run down the slot I just let it ride against the ring knife basically every time I've never had any issues with that you can do the same thing or if you want it to run on that Runner you can do it just like we did the Crosscut sled and install a runner on the bottom to run in your t- slide the next jig I think you should make especially if you have a miter saw and you cut small parts is a miter saw sled not even really a sled it's more of a faux table to set on top of your miter saw what this does does is give you zero clearance in the back as well as the front so you can cut those small parts safer and cleaner because it's zero clearance you're getting less tear out there all you have to do is measure the width and the depth at 90° and then cut a piece of plywood and/ or MDF depending on what you want to use you can use same plywood we're using for the other Jigs and cut that to size from there I cut two small strips and glued them under the back side touching the miter saw on each side and that's going to hold that in place left and right from there I cut a fence that's about 3 in tall and just see glued that to the back to temporarily stick it in place next you want to set the depth setting so that it does not cut all the way through your jig because you don't want to cut again if you cut this in half then you just have two pieces setting side by side so I set my depth setting to cut about an e inch deep and just made that cut now you can do 45s as well if you do a lot of 45 Cuts but if you just do 90° cuts for small parts then I wouldn't even cut the 45s what that's going to do is give you a zero clearance and it gives you an exact spot where that blade is cutting every single single time so it's much easier to line up your cuts and you'll get the same repetitive cut every time making things more accurate and for small parts this is where this is specifically needed because if you're trying to cut small parts on a MIT saw if you've ever tried to you know that the fences Don't Come Close Enough together so when you try to cut that small AP it has a tendency to try to roll back with the blade I've done this and it scared me it literally broke my thumb doing it because of the kickback it's just dangerous and unnecessary when you can build something so simple in about five or 10 minutes this just keeps everything nice and safe and then if you pair that with a million dooll stick to hold those things down this is a great way to cut those small parts not a lot of people have a handsaw to be able to cut these accurately square and to length every time so this is one of the better methods I found of course you could also do this on the cross cut sled cutting very small parts but if you're using the mitol lot this will be a handy jig for you before we get to this handy little Jewel let me tell you about the planer sled now if you have a planer and you have have a board that's Twisted this is the best way I found to get the twist out of that board again very simple 3/4 in piece of plywood as wide as your planer is so this instance mine's 13 in wide I've got a board that's about 12 in or so wide doesn't have to be exact just close and then you're just going to glue and screw a little strip on one end to keep that from basically keep the planer from pulling the board off of your sled the only thing you need to make sure here is that that plywood is nice and straight and flat once you have that done all you have to do is put your board on there shim it up so that it's not rocking once you have it shimmed you're going to run that through the planer make sure you run the cleat side in other words the board you put on the end first because that planer is wan to pull that board that way and just run it through until you have the same surface all the way across this is going to flatten that one side from there you're just going to flip the board over start running that through until the other side is parallel to the bottom side you got two parallel sides and you remove the Twist from that board with a very very simple jig that anyone can make let show you this jig but I got one bonus for you if you stick around now this is for the router table this is one of the safest best ways I've ever found to cut across the grain or cut slots or anything like that in your wood this jig idea was given to me from my friend Mike at Tay tools.com I highly recommend you check him out you're going to take a piece of plywood and cut it 10 in square this is 10 in by 10 in then you just need a piece of plywood that's 2 and 1/2 in tall 11 in long I drill two one half in holes in each Corner That's The Jig now if you're using the router table and you're trying to cut basically a narrow piece cut a Groove across that in this instance I was trying to cut a dovetail Groove across the grain or across the width of the board this board's only about 3 or 4 in wide if you tried to do that without this jig there's no support for it so there's no way to hold that perfectly Square now with this jig you're going to put it up against the fence of your router table set that distance that you're going to want to cut that Groove away from the end and then this gives that support it's going to do two things one it's going to keep it from rocking and two it's going to keep it from tearing out when you finish that cut because if you don't have anything back there supporting it a lot of times you'll get blowout or tear out there this is one of the simplest jigs to make your router table much much safer now there's a thin rip jig for the table saw that I've recommended multiple times this is one of the handiest jigs you can have especially if you're cutting very thin strips and where this comes in handy for me is I'm I'm putting trim on say like my miter station or even this workbench and I need to cut thin strips to go around certain things this is really really handy to have it cuts very accurate it's very easy to use and it's not very expensive I'll drop a link in description below to all these builds for step-by-step guides on how to build these jigs as well as plans available for the ones that I have I made some awesome featherboard jigs you can check out right there click in the Box to get you the big old virtual fist bump or if you want to watch a cross cut sled build go ahead and check that out right there ...


No comments