shop bench ideas “+10,000 Step By Step Plans ...even if you don't have a large workshop or expensive tools!“ Download Today! 👈...
 shop bench ideas
“+10,000 Step By Step Plans ...even if you don't have a large workshop or expensive tools!“ Download Today! 👈
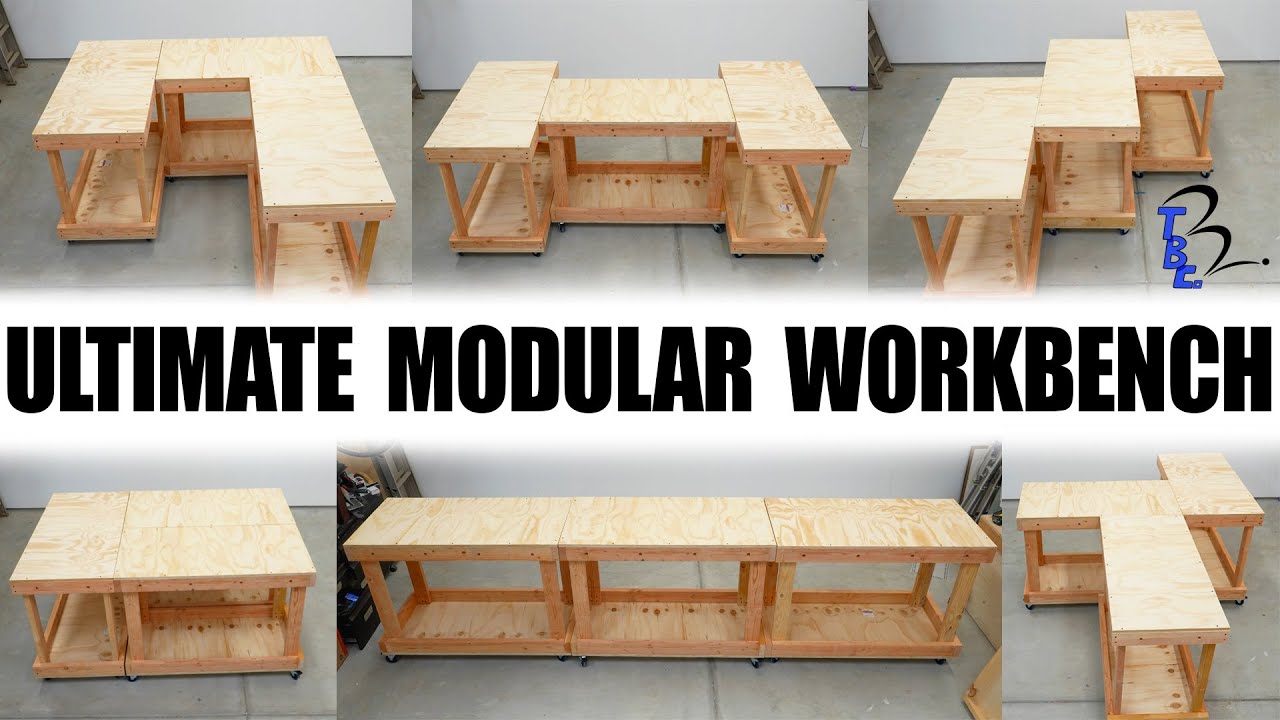
so about a year ago I built this a 4T by 8T super heavy workbench it's been great having a dedicated place to build but I know a workbench this size is not for everyone I would have never wanted a workbench this large until I had a workshop like this to house it I've been tasked with building a workbench for a family member's Etsy shop that's going to function out of our two-car garage so I spent quite a bit of time designing and came up with this it's a fully modular workbench system that is designed to work with you in your space however you like now let me explain it all revolves around a single cart Design This cart has strategically placed holes along the top Edge if you bu an identical cart you can simply bolt them together to make a larger workbench because of the strategically placed holes there are a bunch of potential layouts with two carts if you build three carts there are hundreds of possible layouts and you can start playing Tetris with four carts there are thousands and if you build five Cs we did it it's modular okay okay what a jerk for now I'm just going to build three carts I'm going to show you just how easy it is side note there are detailed plans for this on my website okay let's get to it [Music] I designed this to be as easy as possible to build so it's made out of only a handful of materials and can be assembled with just a few tools the main materials it requires are 3/4 in plywood 2x4s screws and casters the tools needed are a drill 3/4 in Spade measuring tape pencil speed square and some way to rip down the plywood if you need to a circular saw or jigsaw will do the trick here if transporting large sheets of plywood isn't an option most big box stores have a panel saw and can rip sheets down to size for you or they may have pre-cut sheets already for sale all the stores around me sell plywood in 2T X 4ft pieces which is the exact size you need for these workbenches let's start with the plywood if you have full sheets like me you'll need to rip it down each cart needs two pieces that are 2 ft by 4T one dimension is already 4T so measure 2 ft along the 8ot edges and connect the marks with a solid line make your cut and repeat to get the other piece needed [Music] if you're building multiple carts maybe go ahead and cut out all your pieces for now I'm cutting enough for two carts keep in mind that the final piece of plywood will likely be slightly shorter than the 2ft dimension in fact it should be three blade thicknesses shorter Mark that one as a bottom piece because we will use it in a specific spot we have our plywood pieces so let's move on to the rest each cart will require 5 2x4s that are 8 ft long let's cut these into the pieces we need when I know I'll have a bit of leftover I like to start a new board by slicing the end to get a new clean flat Edge the plans will show how to maximize the materials but you'll need to end up with four pieces that are 45 in four that are 24 in and four that are 30 and 3/4 in for now set aside the 30 and 3/4 in pieces those are the legs and we won't need them for a few steps divy up the others so two will be for the top and two for the Bottom now let's focus on just the top this is a really important step in the process I'm going to drill 12 holes in these four boards in specific spots the 24-in boards get holes at 6 in and 18 in the marks need to be in the center of the board you could use a speed square and Mark the center at 1 and 3/4 in but since these boards were a little swollen I used a ruler instead the 45in boards get holes at 4 and 1/2 16 1/2 28 1/2 and 40 1/2 once all those spots were marked with a plus sign showing the centers I used a 3/4 in Spade to punch all the holes I'm going to use half in bolts so having a slightly larger hole gives some wiggle room for inconsistency and UNL floors all the prep work is done so it's time to get into assembly let's start with the top of the frame the four boards with holes go together just like this each connection gets two screws in order to prevent the wood from splitting I'm drilling pilot holes whenever doing something like this I like to have two drills at the ready one for pilot holes and one for driving and screws that way I don't have to keep switching out bits all screws used here are 2 and 1/2 in the bottom frame goes together the exact same way now it's time to add the plywood sheets I start at one of the short ends line it up nicely and drive in two screws I'm using slightly shorter screws for this anywhere from 1 and 1/2 to 2 in would work great this is your chance to square up the frame we assume that the plywood is square so we line up the other short side with the plywood then drive in two more screws to finish it off I drove in three screws in each of the long sides just be sure to avoid putting screws through the bolt holes you're going to need those later it's the same process for the bottom but avoid putting screws too close to the corner the screws for the casters will secure the corners we now have the bottom and top completed next let's add the legs I took the top and flipped it upside down the long edge of the board goes on the long long edge of the platform I used a clamp to press it into the corner and hold it steady I drove the screws in without pilot holes and only had minimal cracking you could drill pilot holes if you like and you could also Drive the screws in from the outside I just think it looks a bit nicer if there are less screws showing each leg should get at least three screws preferably four to make it super sturdy I have now successfully made a table it's doggo inspected and approved now I can add the bottom I flip the table upside down and place the bottom on top it's the same process attached in the other ends of the legs you just have to make sure to pull down on the table before clamping and driving in screws so there aren't any gaps the last step is to add casters there are a few different options based on what you need out of this workbench for this I bought economical lock and cures from Harbor Freight the Wheels lock so it can't roll away more advanced casters also prevent rotation when locked really preventing it from moving at all choose the casters depending on your needs and just remember you can always change it later I used the same shorter screws to attach the casters the holes are bigger than the screw heads so I used small washers to make it work I connected the casters about a/ in away from the edges I flipped it back over and just like that one workbench is done it's really sturdy and has a lot of surface area to work with there's built-in storage underneath and in a bit I'll explain more ways to make it functional the real benefit of this workbench system is the ability to expand it so let's build another one this will function exactly the same the only difference is that the slightly smaller sheet of ply will be attached to the bottom [Music] frame now I have two workbenches and I can show you how they connect you will need 1/2 in bolts that are 4 and 1/2 in long as well as washers and nuts to go along with it if you're building two benches you'll need two bolts and if you're building more workbenches you'll need two more bolts per additional workbench whichever way you line them up the holes will align and you'll be able to secure them together if you line them up like this just use the outermost holes when I build something and film the process it always takes at least three times as long so I was curious how long it actually takes I went out and bought a clock just so I could show you in real time okay let's see how long it takes to build one of these things and we got three two one let's go that's clock nothing is pre-cut here it's all raw materials so while I am working pretty fast it shows the true potential of how quick this can be built from start to finish I'm really excited about this design this is the workbench system I would use if I was still working out of a two-car garage it's quick and easy to make super functional and easily adjustable from Project to project you could turn a cart into a downdraft table or of integrated dust collection because the workbench is only 2 ft wide it can roll through most doorways they can work great not only for woodworking but for tons of other endeavors such as a small business the hobby serving tables the list goes on plus I'm about to show you just how versatile it is to best fit your needs stop the clock what I do take 40 1 minutes that's not bad not bad at all what do you think what do you think we have extra time extra time you want to go each cart has an open void below the work surface it already has a built-in Shelf at the bottom with a lip around the edge that's great for storage there are endless possibilities for what you can do with this space here are just a few examples a simple shelf using the leftover 2x4s in plywood whether it be for General usage or size to fit a specific tool a similar shelf but built more heavy duty this would benefit you if you're using smaller than 3/4 in plywood the plywood could also go on the bottom to make a second bin and in addition you could utilize the sides to add pegboard I personally am not a fan of Pig board but hey you do you an organizational system that I'm a big fan of is French cleats it just has the potential to look so good if you want to learn more about French cleats check out my videos on that horizontal storage is great but in some instances like what these workbenches will be used for vertical slot storage allows a stash of shipping boxes to be at the ready another great benefit of these workbenches is to utilize the holes in the side a 3/4 in dowel can be used as a hanging rod for a bunch of stuff such as a drying towel paper towels or in this case a ridiculously large roll of bubble wrap there are so many possible ways to utilize this cart you're only limited by your imagination it's moving day you know one of the great benefits of these workbenches is that they're mobile [Music] oh did I mention that these are going in my garage so not too far of a trip I arranged them in a predis configuration and bolted them together with a few of the wheels locked I couldn't budge it at all I began moving some of the tools and supplies around this is for a sublimation Etsy business like printing on mugs and tiles and ornaments it's so cool seeing these workbenches functioning for something other than woodworking the possibilities are endless if you're interested in building these there are detailed plans on my website showing step by step just click the link below okay that's it for now see you are you stuck are you stuck okay there you go hey takey we get it it's modular jeez Let It Go hey hey terrible throw nice and close hey we oh don't break the camera and that's a wrap ...
“+10,000 Step By Step Plans ...even if you don't have a large workshop or expensive tools!“ Yes, Get Access To 12,000 Shed Plans! 👈


No comments