diy tool chest “+10,000 Step By Step Plans ...even if you don't have a large workshop or expensive tools!“ Download Today! 👈 ...
 diy tool chest
“+10,000 Step By Step Plans ...even if you don't have a large workshop or expensive tools!“ Download Today! 👈
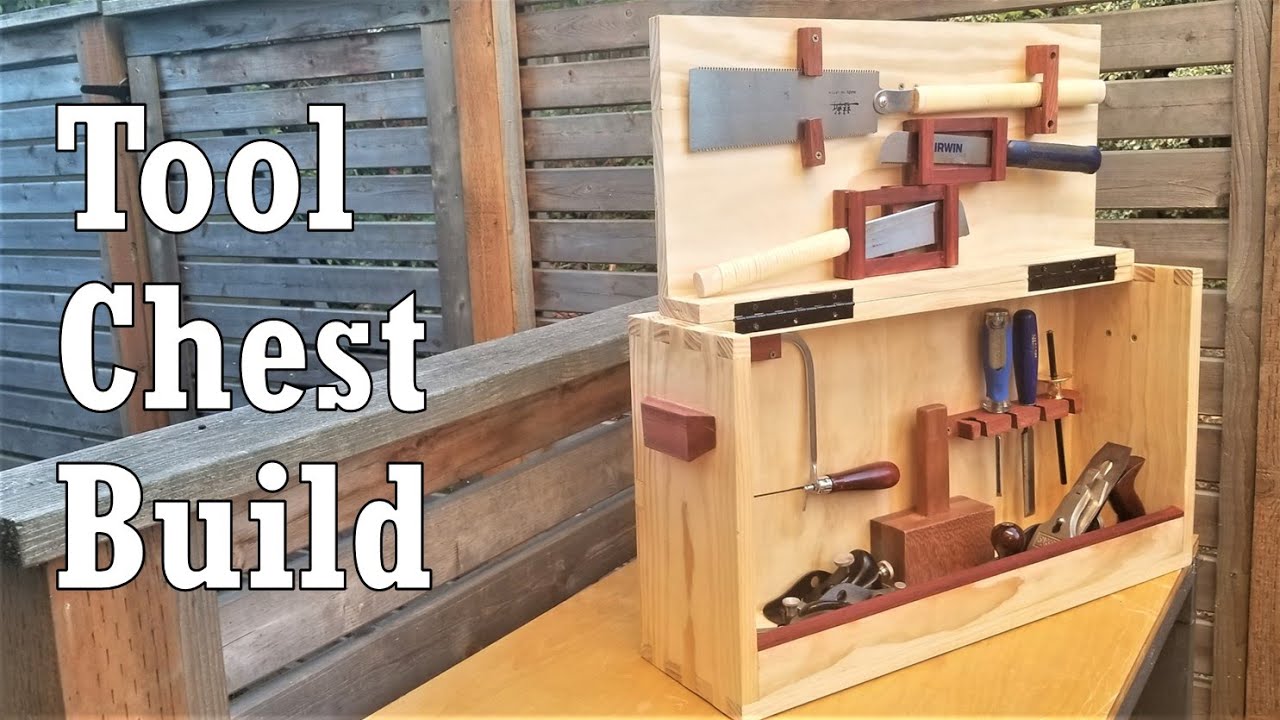
hey y'all my hand tool collection is growing but I don't have anywhere to store them so today we're going to build a tool chest we're going to build the main structure out of pine as prices are finally dropping on it and we're going to use this project to practice hand cutting box joints as well as some other chisel work my largest saw is 24 in long so we're making the inside dimensions 25 in wide by 15 in tall by only 7 in deep part of the reason for this small awkward footprint is that I do have to carry this outside every time I want to work on a project so it needs to be portable and it needs to be will sit on top of my workbench without taking up too much space after cutting out the top bottom and sides I start the Box joint layout process by marking the depth of my joints then tracing that line in pencil to make it easier to see I then lay out where my joints are going to be making sure they're all evenly spaced so they'll look appealing when done I flipped over the board and marked the back to make sure I have a reference on that side too so I don't cut too deep and lastly once in the visce I Mark the tops to complete the layout my first two cuts didn't end up great they varied from the line a little bit but what I learned was I was holding the saw too horizontal and so on the third cut I kept the saw at a 45° angle focusing on my top and sideline as long as I could and then slowly rotated it horizontal and had a much easier time following the lines as you can see here from the last few cuts on the board you can barely even see the pencil marks I then went through and cut the center line through each of the throwaway pieces to help help make the cleanout easier now to start the clean out on the first section I tried using just the Chisel and mallet to knock out the debris after getting halfway through the first side I flipped the board over and used the same method to knock out the back this took a long time so attempting to speed up the process for the second section I used the P saw to cut away more of the material hoping that would speed up the process going back to the Chisel to finish it up it came out just as clean but it was still very timec consuming for the third section I decided to break out the coping saw another tool I inherited from my grandfather and I'm definitely not proficient in uh but it really made quick work of cleaning out the excess and made the Chisel work much easier getting just as good a result for the rest of the boards what I ended up doing was using the pull saw to make an initial removal then cleaning up with the coping saw and then finishing the cuts with the Chisel once I got all the fingers done on the top and bottom I then started on the sides I marched each side to make sure they would stay paired up and then used a d board uh to be the guide for the side piece after repeating the process the main box was ready to be test fit being my first big box joint project I think the joints came out pretty well they aren't necessarily as tight as maybe I'd want them to be but there weren't any significant gaps on any of the corners or sides before gluing I need to cut the top of the board in half as this will be part of the hinge top assembly later in the the build you can see here how it will eventually fold up on top now for the glue up including gluing in both of the top pieces I used all my clamps and then I checked for square now to build the back of the box my thought was to build a panel and insert it into the back using the box joints as well I glued up the panels to get a good fit but math is hard sometimes so I ended up having to go back and add a fourth panel later I then cleaned up the panel with my Jack plane to get a nice smooth surface and then traced the back of the box onto it and started the cutout process this cutting out of the back of the box did not go nearly as smoothly as I hoped for and it needed a lot of reworks and touch-ups as it continually didn't fit each time I tried I kept marking areas that seemed to be in the way and kept chiseling away at them until it would fit once it did fit I glued it in place and clamped it overnight you can see here a few gaps in the sides this will definitely not be a method I'll be doing again of putting it back into the box uh but we'll fix a lot of this here shortly after cutting all the excess fingers and giving the piece of light sanding I cut open the lid piece again this time down the sides leaving the box joints glued in place test fitting the flip up lid by folding up one piece it left a larger bottom section to close out the front of the chest than I wanted so I trimmed it down and needed to add the rest to the lid after smoothing out the cut I glued the bottom of the front to the box and assembled and glued the flip up part of the front again smoothing the piece out after glue up you can see here the initial fits pretty good now for the hinges I marked out my placement on the lid and box and ended up doing all the carve out with the Chisel making sure to keep the edges straight and clean as possible even with that blowout happens sometimes but nothing some glue and clamps overnight can't fix now with the rough assembly done I cleaned up the edges with scraps and glue and Sawdust anything with a big gap got a piece of scraping at first and then I filled the rest with the glue and sawdust mixture after drying in a quick cleanup the piece turned out presentable with most of the big issues in the back luckily after a thorough sanding it was time to start assembling including adding the hinges pilot holes and hand screwing the screws to make sure they didn't strip ended up working out great you can see a bit of a gap when it folds down but we're going to fix that with some trim Rockler had a bunch of this podal in the scrap bin on sale so we're going to use that for the details for the tool chest to start we need handles I went ahead and cut a 45° piece out of the bottom of this to make a comfortable handle but I wanted to add a little bit more flare so I cut each side at 45° as well after marking and pre-drilling the sides I glued on the handle then pre-drilled and counter sunk the screws into the back of the piece after doing that on the other side I also added one to the lid for easy access now where the lid meets the bottom I glued on this ribbon of padal letting it dry overnight then came back with a flush cut saw and a jack plane to even out the piece after a quick sanding the piece is still not done I had to do several passes with the Jack plane on the bottom of the fold down lid to get it just right so it would close right in place I used tongue oil to finish this piece uh it helps bring out some of the Grain in the pine to make it look more interesting and will protect it overall after a coat inside and out I built a few holders for some of the tools and hung them by pre-drilling and hand tightening the screws in so they won't chance punching out the back and also I can move them at any time as I need to change or add new holders after a coat of tongue oil on the holders the chisels went in and can't fall out without being lifted up I made this holder for my coping saw for my pull saws I tried a few different holders and all of them work well and yes I can close the lid and reopen it with the saws not falling out I then added the rest of my hand tools once I use the tool chest for a while I'll probably make more tool specific holders and I've got plenty of room for it and more tools as my collection grows well that wraps up this build if you enjoyed it please like comment and subscribe and I will see you on the next project thanks [Music] [Music] [Music] ...
“+10,000 Step By Step Plans ...even if you don't have a large workshop or expensive tools!“ Download Today! 👈


No comments