simple work bench “+10,000 Step By Step Plans ...even if you don't have a large workshop or expensive tools!“ Yes, Get Access T...
 simple work bench
“+10,000 Step By Step Plans ...even if you don't have a large workshop or expensive tools!“ Yes, Get Access To 12,000 shed Plans! 👈
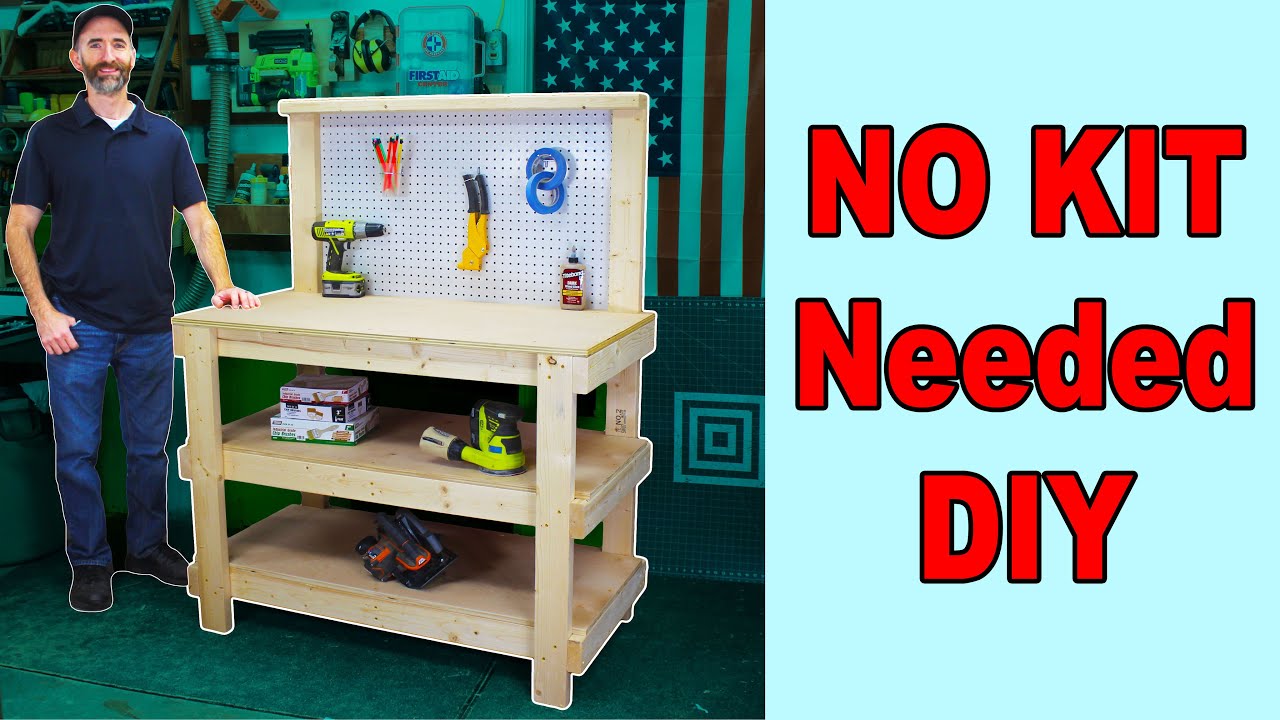
let's see if we can build a simple heavy duty workbench without a kit for about $100 let's go 2x4s are usually inexpensive and you can find them just about everywhere so we're going to base the frame off of them I drew up a quick sketch to get an idea of what we're going for I want this to have three separate levels or three shelves with the top one being the actual bench then have a little rise going up in the back so that I can have something like pegboard or something to I can hang things from and attach it this right here has a bunch of possible upgrades we can do in the future and I'll show you that more later our first cuts are going to be the back legs they are the longest boards and you want to make sure they're the straightest and best quality out of all of them otherwise everything else could be a little bit out of whack let me give you a word of warning though when you're shopping for your 2x4s the quality of wood has went way way down over the last couple of years so make sure you look for the ones with the least amount of knots and especially the ones that are not warped otherwise your final product well they just not going to look that good I'm going to use a mitera to make most of these Cuts but you can use a circular soft that's all you have and we want these legs to be cut at 59 in and with the remaining wood I'm going to use those to cut out the front legs which will be 36 in chances are after each cut you're probably going to have to touch up the in your boards with some sandpaper cuz there's a bunch of splinters next up we want to cut out the frame for the shelving that goes all the way around so we're going to need six pieces at 45 in and six at 24 now normally I don't like cutting out all the wood before I do a project but I figured on this one it' probably be the easiest for you now also cut out some additional pieces these are 18 in Long these will actually go up under the shelves to give some additional support I also need the board that goes across the top of the back two legs that'll be at 45 in now I know that's a lot of numbers to remember so I created a cut list let me show you these are the back legs the front legs here are the 645 in here are the 624 in here's the 18 that I just cut out and the 45 for the top and if you use this setup you should be able to make this with only 8 2x4s for assembly we're going to start with these shelves first and just remember you're only going to have one real side that'll be seen so if you have anything like a lot of ink or a lot of imperfections in your wood just Place those toward the inside or toward the back and you'll never see it next up we need a nice flat surface to assemble this on my workbench is flat but if you don't have a workbench already you might want to consider a floor and if you are going to use a floor make sure you find the flattest spot cuz a lot of floors are really uneven I'm now going to place the 24in long board on the outside of our 45 or our front our back because we're actually going to inset these one thickness of a board therefore the legs that we're going to install in a little bit will actually be running on the outside of our 45 in using a corner square or a straight edge will definitely help you line this up CU you want this to be pretty close and a clamp might be helpful to hold these two together because I'm going to use a couple 2 and 1/2 in Long screws to connect this Frame together but not the spacer I also like to pre-drill these holes to prevent cracking but it's not required then just repeat that process on the other three corners next up we're going to use one of the 18inch boards and we want to put it in the center of the Shelf make sure you line everything up then we're going to put a couple screws on each side then we need to repeat that process two more times once you've completed all three you want to take each one flip it upside down so that the top is facing down on your flat surface and then test the corners you want to see if there's any warping or rocking going on then take the flattest one and that'll be the top of your work bench now if by chance you do have some warping and some rocking in the other two that's okay those shelves they don't have to be perfect but you want your workbench to be as flat as possible now that we know which one of our frames is going to be the top section we again want to take it and place it top facing down and we're going to install the legs we're now going to install our front leg so line everything up in that corner that we prepared before and now we're going to clamp it together so it doesn't move I'm now going to add two screws going in this side and two on this side and that should lock that leg in super strong and if this is done right it should be pretty close to square with the front legs now installed I'm going to flip this entire piece onto its side now I can take the back legs and I can balance them right up here on this Frame and clamp them down and that way they don't interfere with the floor or in my case the ceiling now before I secure these back legs in place I need to remeasure the front legs which in my case is 32 1/2 in so I need to make sure that these back legs are also extending out 32 1/2 at this point it's a good idea to take those shells and just kind of temporarily put them in place we just want to make sure everything is going to fit together and not be too much of a bind so far so good now that I know the shelves fit in there well I want to make sure that there's at least 4 in from the bottom shelf to the floor that way our feet can slide under there we're not constantly kicking it then I want to measure out the distance between the bottom shelf in the bottom of the top workbench that way we can get this middle shelf about even but don't forget we also have some plywood that's going to sit on top so make sure you add that in as well now that I have everything measured out I've clamped it in place to keep it from moving and I'm going to add screws just like I did on the top shelf now let's see if we can flip this thing over and do the other side oh definitely easier said than done okay got it once I got all the shelves secured I flipped it onto the floor so I going to have a little bit more room and we're going to do rest of the assembly right here next up is adding the tops to our workbench and our shelves but it really depends on what you're going to use this workbench for if you're planning on doing a bunch of Building Construction where you're Hamming and Drilling and potentially having really heavy tools sitting on top of the workbench then i' suggest getting something that's about 3/4 in thick it doesn't have to be as fancy as this nice hardwood plywood behind me just some basic Pine plywood should do the trick and if you plan on using this for maybe something like a craft room where not going to put super heavy tools on it I'd probably even suggest some half inch plywood cuz this Frame is already pretty rigid just for the heck of it I looked up the price difference between the 3/4 and/ in and it is about an $8 difference for the big 4x8 sheet so it's totally up to you on which one you want when I went out to my storage building to grab that Pine plywood I realized oh no I'm already out apparently I used it all up in the last two pinch builds that I did if you like to see those I'll put a link to those in the description and at the end of video so make sure you check those out so to keep me from having to go to the store I'm going to use what I already have on hand which is a hardwood plywood which is definitely overkilled for this build but uh it is what I have for the top of our workbench we're going to stick with the 2T X 4T which is a standard size that a lot of workbenches are made out of but for the lower shell I'm actually going to make them a little bit narrower instead of having our plywood come out to the end of our leg here I'm actually going to inset it about an inch and a half so it's even with our frame and that'll give us just a little bit more room when our leg and knee is moving around we're not constantly bumping it once we have the plywood cut the size we need to notch out the back for the legs and there's actually a couple ways to do this if you want to be fancy you can cut out a full Notch that wraps around the plywood and it'll look pretty good but to keep it simple you can just make two cuts and then allow you to wedge it in [Applause] place perfect oh yeah I have to admit I'm a little excited that these went in on the very first try usually when you're working with like a 2x4 frame something's a little twisted and you kind of have to refine your Cuts but uh first try that's awesome I hope this happens when you build yours when it comes to holding these tops down the two lower shelves I wouldn't be overly concerned with because they might shift around just a little bit but they shouldn't come out they're kind of sandwiched in between the 2x4s but you could always put a screw on each end just to make sure they don't move as for the top I would highly recommend putting at least six to eight screws around it just to make sure it doesn't move because you're going to be using this a lot and I'd highly recommend pre-drilling your holes so it's less likely you'll crack your plywood and the last piece of wood we need to install will connect these two back legs together this would probably look the best if I installed it about like so so that way it' be flush on the sides and on the back but I have some plans for some upgrades in the future so I'm actually going to install it this way with the overhang protruding toward the [Music] front and to finish off the back of this workbench we're going to install some pegboard this is just a 2x4 sheet that you can purchase at most hardware stores but it is just a slightly long for the back of this setup this is only 45 in wide and this is 48 so I trimmed it down to about 44 and a half and that way it'll sit just behind the back of this Frame and look nice and to install this in place you just need some basic flaad screws now let's see how sturdy this thing is oh yeah that's not moving at all awesome the basic workbench is now complete but how much did it costs let's find out now let's break these costs down for you the plywood a 3/4 in 4x8 sheet of pine plywood should cost about $50 again I use something different cuz I just wanted to use what I already have on hand but the sturdiness shouldn't be any different now I needed eight 2x4s which cost about $28 I needed this peg board which cost about $13 I need a box full of 2 and 1/2 in Long screws which cost about $11 and just a small baggie full of some small screws to attach the peg board and that was about $2 in total $104 now our original plan was to build this workbench for $100 and it made it to 104 so it did go over just slightly but overall I'm super excited because it's still a really nice workbench now I plan on doing a bunch of upgrades to this workbench in our next video so make sure you keep an eye out for that otherwise you might want to check out these other workbenches ...
“+10,000 Step By Step Plans ...even if you don't have a large workshop or expensive tools!“ Yes, Get Access To 12,000 Shed Plans! 👈


No comments