shop workbench ideas “+10,000 Step By Step Plans ...even if you don't have a large workshop or expensive tools!“ Download Today...
 shop workbench ideas
“+10,000 Step By Step Plans ...even if you don't have a large workshop or expensive tools!“ Download Today! 👈
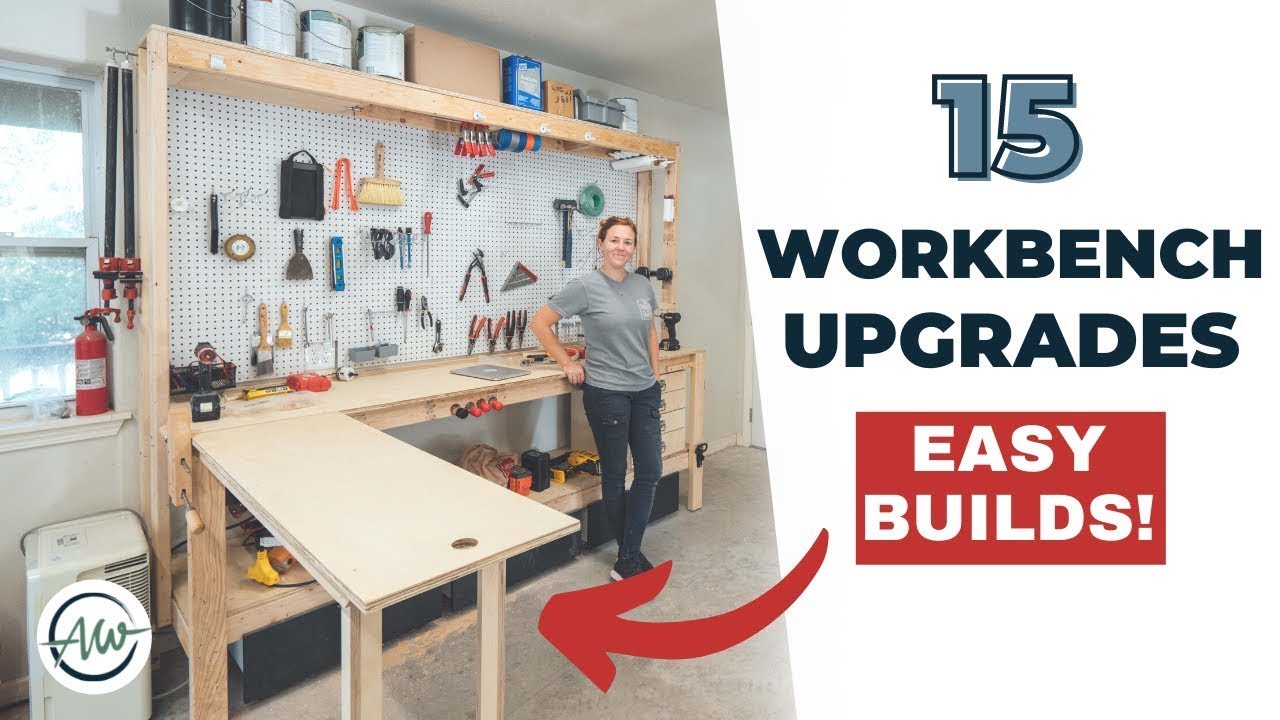
real quick i want to thank this video sponsor which is simply safe a few weeks ago i built this workbench for my garage in a single day well it has some great features already like a front lip for clamping stuff down a shelf for upper storage drawers with casters for lower storage and even simple adjustable feet i've now added 15 more upgrades they are all quite simple and cheap but these 15 little things make a huge difference so let's jump into them first up is a bench vise hand screw clamps have kind of gone out of style but they are the only clamp that is made from wood making them incredibly versatile as you can screw things to them or screw them to things with just two screws i can attach this in any orientation to assist with holding something but if it gets in the way i can just as easily take it off until it's needed again and you just simply can't beat fifteen dollars for a vice over here i mounted a real craft hose reel when i was originally building the workbench and this has been so useful to get me power anywhere in the shop there's a common myth out there that cord reels are dangerous due to heat buildup in the cord spool but all real craft units are ul listed and designed to handle heat buildup so you don't have to worry about it next is a place to store pipe clamps these are handy but a pain to store what i do is buy a few threaded pvc end caps and a few eye bolts you punch a hole into the end of the end cap then thread in an eye bolt with a few nuts to lock it into place and very quickly you have a way to store these on some unused workbench space or a wall [Music] [Applause] [Music] pvc is very handy in storage capacities an obvious one is to grab a length and cut a shallow angle on both ends and this will give you space to throw in a screw and attach it to a surface such as the underside of a shelf i grab the size that would hold tubes of caulking i also put them in a corner of my shelf so that the tubes themselves create a second shell for excess tubes another pvc trick i love is to grab a length and use a table saw to cut out about a third of the diameter if you feel comfortable you can just run the link through the blade until you remove the section however if running a round object across the blade makes you nervous a trick here is to use a scrap to temporarily attach it to you can use a screw hot glue or double sided tape then you'll have a flat surface to ride along the fence giving you a straight cut now cut what remains into sections screw this to a wall or workbench surface and you have a spring tension holder always at the ready for a sleeve of pvc if you want to turn this into a cup you just need to cut a wooden circle the same size as the bottom and screw it in now you can toss in whatever you want to easily store [Music] then the last pvc trick i have for you is to cut a quarter inch section out of the overall diameter now what remains is a strong hook i'm using it for levels to utilize the front two by four but if you place them on a wall it would be great for cords or bags or really anything they're surprisingly strong sticking along the top of the workbench i drilled a hole in one of the framing members of the top shelf now the fun part it's not fun just being sarcastic just big enough for a piece of all thread to go through i placed a nut on either side so that it can't move and now i have a quick way to stow away squeeze clamps and tape on another said bay i played around with building a i don't know a drop down bend i built a lip from scraps on the left side and then i built a simple bin that's just butt joints and glue the idea is to pop the bin up and out of the way keeping it there with a gate latch but then if i need it i can drop it down and move it to where i want to work if i'm being honest i can't think of what i want to store here but it was just such a great use of space that i imagine that once i build it i'll figure out something to put up there real quick i want to thank this video sponsor which is simply safe there has never been a better time to make your home safe our friends at simply safe are now giving you early access to all of their holiday deals a 40 off or more on their award-winning home security it's the best deal of the year you guys know that i've used simply safe from our personal and commercial shop security for a while now they make ordering and setup easy by enabling you to design a system best fit for your space and ship it directly to your doorstep they've got sensors to cover every window room and door plus lots of great extras like water sensors smoke detectors hd cameras for indoors and outside and doorbell cameras their new wireless outdoor security camera has a built-in spotlight with color night vision and two-way audio allowing you to speak directly to somebody on your property simply safe is trusted by over three million americans and it's no wonder as i found all of the devices to be very reliable setup is a breeze and they're easy to use 24 7 monitoring service calls the authorities immediately in an emergency making me feel extra safe you can save 40 or more in your simply safe security system during their holiday sale visit simplysafe.com april to learn more now i do have a full sheet of pegboard to utilize but storing tape measures on pegboard just never works out for me so instead i grabbed a steel ruler at the store and put two holes in it i placed two nuts on the backside to make a standoff from the 2x4 and then i screwed it down this gives me a lip to quickly hang my tapes instead of having them take up space on my workbench top while i'm not a huge fan of drawers in the shop i like things to be visible and accessible i will admit that drawers are best for some things so i went ahead and built a simple chest for the bottom shelf a few tips anytime you make drawers for a shop keep it simple no fancy joinery is needed glue and screws do the trick for the drawers and same on the body also instead of using a big piece to make an entire bat make a corner gusset instead this will keep it from racking but not use as much material instead of using expensive drawer slides use wood use scraps now wood on wood can slide but sometimes not smoothly to help with that get some melamine edge banding to attach it to the top surface of runners look for the peel and stick kind if you really want to speed things up i've never had one of these come off but if it doesn't slide enough for you put another strip on the bottom side of the drawer then one last tip for a chest of drawers is to put a handle on the front so that of course you have a pool but also put one on the back so that you can easily carry the drawer around the underside of my main workbench has open cavities just like the top shelf making it a great spot to hide things you can buy magnets with a hole in the center so that you can attach them to things using a screw so you can buy a bin and glue washers to the bottom side the same distance as the magnets then you have a storage spot for cash for candy for anything you want to keep to yourself so one more for the underside but this one's not sneaky tubes like these are great for holding a large variety of items so what i did was drill a few holes a little larger than the diameter then i built a tee for the back end this is just a lip to hold the tubes up it can be screwed to the underside of the workbench just make sure the screw length is short enough so they don't pop through the top now i can organize things like zip ties sawzall blades or yes candy what they fit in the tube i couldn't not have a tube full of recess here's a quick way to store a combination square i don't like to hang these on peg boards because they hang wonky instead i grab a scrap of one by and cut off about half an inch now i'll turn the piece over and run the blade through the end making a curve that just so happens to fit the roll of a square to keep it from falling out glue the piece you cut off back on now screw it to any workbench and you have a holster for your combination square moving along to the side i wanted to build some sort of extension that wasn't permanent but would allow me to have room on all sides so i grabbed a scrap of three-quarter inch wood for the top and made a simple frame for the underside [Music] then for the legs i ripped down some more scraps to make two l shapes i added in two cross braces to connect them then use two hinges to connect the legs to the top i attached a french cleat on what i'm calling the bottom side and then a mating cleat to my workbench now i can attach the extension anytime i need more space or i'm working on something that i need access to both sides i also attached a french cleat on the left side of my workbench so that i have the option of putting it over there should i need want to but keep in mind that you can put a french cleat anywhere and utilize this like i work on stuff but i resort to playing the drums whenever i'm trying to demonstrate a workbench then to sort away i simply drilled a large enough hole near the top to put a lag on the side of my workbench and hang it up this workbench has a few things up high and to avoid having to grab a step stool anytime i need something i bought a pair of these metal steps you typically find these on campers or trailers these can be screwed to the leg so that i can flip them down to get a quick boost i think this is such a cool tip and you can find a pair for about twenty dollars and i thought it was done there but it is the end of the day and i decided it was lacking a very important feature an onboard beer opener yes yes of course you can buy a good looking one with your favorite team on the front from the store but if you're in a bind drill a screw with a built-in washer into the lip of your workbench then prop your feet up and admire how much more efficient you made your workspace today so many of these things i used on my workbench and you can easily adapt them to yours or you can just put them on a wall so i hope that you've been able to find some good resources or ideas in here come here bud um totem sure does like it anyways i hope that you have found some uh usefulness in this video leave me a comment down below and let me know which one is your favorite and i'll see you on whatever i'm building next guys you're in the way of my wave if you're looking for some great software's plans then i have a link for you right here for this one as well as two other variations this one's cheap it's sturdy it's very quick to put together and the thing that i like the best is that it's foldable and it's collapsible ...
“+10,000 Step By Step Plans ...even if you don't have a large workshop or expensive tools!“ Download Today! 👈


No comments