furniture making tools “+10,000 Step By Step Plans ...even if you don't have a large workshop or expensive tools!“ Click Here ...
 furniture making tools
“+10,000 Step By Step Plans ...even if you don't have a large workshop or expensive tools!“ Click Here 👈
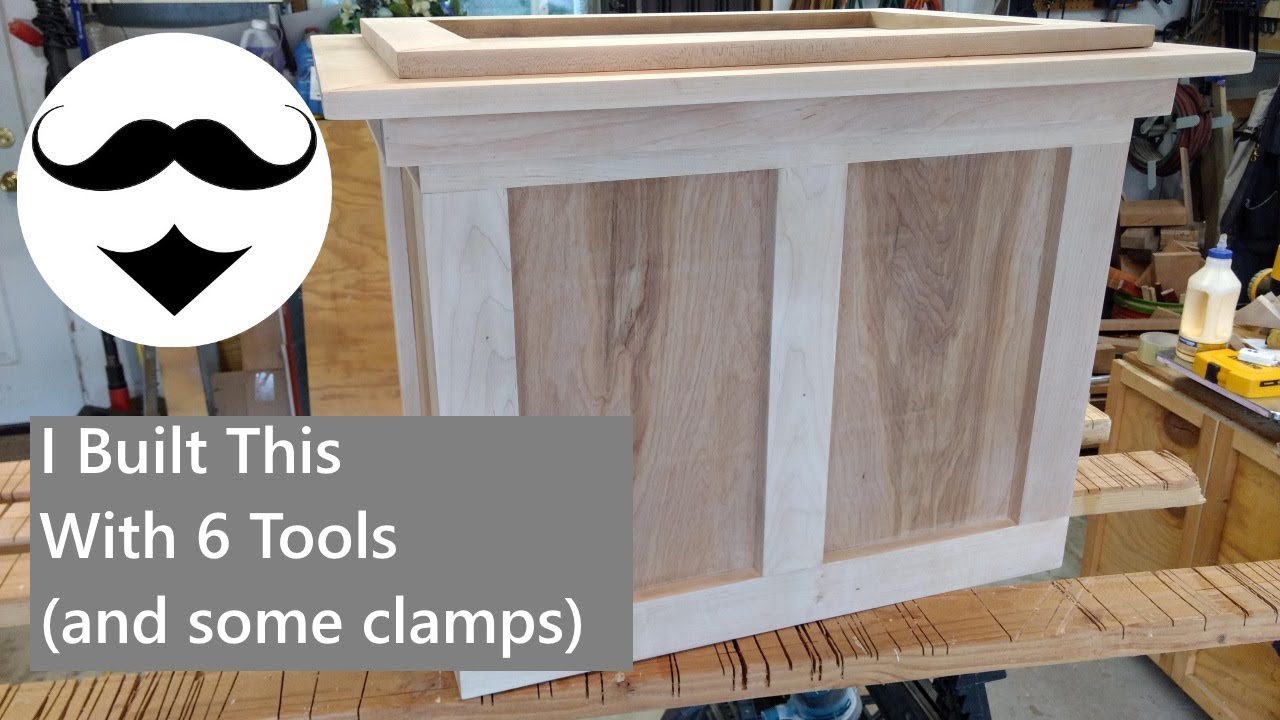
hey everyone it's tony from the handlebar workshops and today we're in the garage workshop i built this it's a cabinet for garbage cans using only six tools people tend to think that building furniture you need all the expensive equipment with the table saws and band saws and whatnot you don't i use the tape measure to make everything the correct size then using the speed square and the circular saw i was able to cut everything using the drill and the pocket hole jig i was able to connect everything together finally using the random orbital sander i was able to finish it all off then after putting on a good looking and durable finish i was able to put this in my kitchen and it works wonderfully using just a regular tape measure i got some pretty accurate measurements of the length the width and the height of the two garbage cans pushed together using those measurements i came up with a more detailed drawing of what i wanted to build i opened up the measurements a little bit so that the garbage cans would have some room to move around in there so we weren't fighting to put them together and fit them in there tight so now we can start cutting up the wood into the sizes indicated on that drawing i made now i need all the ends of the one by to meet up nicely with the edges of the other one byes and i don't trust what came from the mill so i'm going to cut that off square everything up using a speed square this one's a metal one but you can use one of the plastic ones from harbor freight or one of the other home stores i'm just going to use a circular saw and i'm going to use the square as a fence to run my saw across now if you have a chop saw you can do this on the chop saw this is a 1x2 according to my drawing i need four of these 15 and a half inches long so i take the tape measure i put a little mark right at 15 and a half inches use the speed square move it up to my pencil mark the line across again using the speed square i can use this to line up my cut so then i'm cutting just to the waist side of the line i just need to do that three more times now i have four one by twos all about the same height and now i gotta cut up the one by threes it's essentially the same procedure over and over again i'll come back to you when i'm done with all that so now we've got everything cut out we've got our uprights here are everything that's up and down and everything that's side to side the top and bottoms here now the reason we went with the one by twos and the one by threes for the upright is when you put two of them together like this we're making an l shape at the corners that's almost as big as a 1 by 3 by itself so that way from when you're looking at it from this direction it looks almost like this it just looks more aesthetically pleasing i'm going to using a craig pocket hole jig if you don't have a pocket hole jig you can just screw them or nail them together with some glue these are three quarter inch pieces here so according to the instructions i have here the pocket hole jig gets lined up with the edge of where you're gonna put the pocket hole now we do run into a bit of a problem with joining the one by twos on this side like this as an experiment i set the device up as per the instructions for three quarter inch stock which means it's supposed to be flush here i drilled it in it's all the way over here you can see there's a bit of a half circle there into the side which i don't want using this little line across here i set that even with the edge here clamped it on and drilled it in and it's much more regular looking and there's no sign of it on the outside here now normally you would have a one and a quarter inch screw for three quarter inch pieces this is just a wanted screw which is normally used for half inch stock i found i can put that through and it won't come out the other side of the three quarter inch piece that i'll be screwing into so i'm just making a workshift table out of three quarter inch plywood and saw horses i'm going to clamp the 1 by 2 and the jig to the table all of the uprights get pocket holes in the bottom and the top because they're going to tie in to the top and bottom bars like this so you screw in here and then we'd screw in up here like that the wider ones will get two pocket holes the thinner ones will get one pocket hole and now that we don't have to worry about being so thin here we can do this just like the instructions say and set it up flush with the edge like that one tip though if you've been drilling a lot don't touch that metal circle it gets really hot [Music] see how the packets are overlapping like this that's fine we're gonna have a screw head down here and a screw head over here they will not interfere with one another these pockets just make it easier to get a screwdriver or a bit on the drill in there easier just an aside i do a lot of pocket holes in this project and i'm using the craig jig a lot this video is not sponsored by craig or anyone else for that matter but it's a tool that i've used a lot and i like it all right so i wouldn't put in pocket holes and everything uh this is the side panels the short sides now you'll notice that i put two pocket holes in the ends of each of these boards as well these are going to be attached to one by threes like this while the other ones are attached by one by threes like that so we have to drill in to here or screw into here with the pocket holes another thing we want to make sure we notice is that all of our pocket holes are pointing out the same directions you don't want to actually have this one like this and then screw everything together and then find out your pocket holes are going this way instead of this way i'm going to screw the pieces together here and here but i'm not going to put any glue because just in case you swivel a little bit i don't want them drying in the glue that way i want to be able to swivel them back into place when i put the plywood on top of this all right to make sure this piece doesn't move i'm going to clamp it down with a regular clamp i'm going to use the speed square here to square everything up i'm going to make sure that everything's flush on the outside here i'm going to use the clamp that came with the craig system to clamp it to my work table and then using the one and a quarter inch screw that came with the kit as well as well as the driver bit that came with the kit i'll drive the screw in and now i'll do all four corners okay that didn't work so i made a mistake when i went to cut these pockets i had the color set up for a half inch that way i didn't blow all the way through these but i forgot to reset it when i cut all the other ones so we got to get them we got to redrill these holes you just want to snug it up don't want to strip it out [Applause] so i clamped this piece to the work table this is either the bottom of the top depending which way it goes it doesn't really matter i marked a little mark on the center here and i marked the center on this piece of wood here so that way i can line those up i've got another mark on the center down over here i'm going to use some glue just some type on two since it's going to be inside now we just do the same on the other side i'm going to look at the wood and figure out which side looks best and that'll be my outside this is a lot more black streaks in it than this side so this will be my outside so that goes down and the inside goes up now a little different here we gotta put glue on all three sides on all three ends at once here gotta use a little bit of strength here to push this out and there's a bit of a gap in here but that'll close up when i put the screws in there closed up you can even see the glue squeeze out over here since i cut all these pieces with the circular saw on the speed square some of them aren't quite the same size so i put the shorter one here in the middle because if i put it on one of the ends it would teeter-totter a bit but since it's in the middle i should be able to bring these together and it won't be nearly as noticeable that way all right i got everything pretty much as tight as i can with the clamp now i'll put the screws in and those should help drive it closer as well i had to break out the impact driver in order to get this to work now we need to connect the short panels to the longer panels we're going to do it like this with the short panel down on the worktop and these big panel up on the side like this so we're going to put them up together and we'll clamp everything up and screw it in we've got the short screws on the one by twos and the long screws going in the one by threes before we do any of that we got to put glue on it and here we finally have nice long grain going up against more long grains that should be a nice strong joint right there even without the pocket hole screws but that'll make it even stronger now this is a short screw it's going into the one by twos i always want to double check that you're flush on the bottom here where these two are going to meet so far so good so i'll put another short screw i hope that moved on me so you can see how there's a little step here i can correct that with clamps if i just clamp this here you can bring that down but this thing this part still moves around a little bit [Applause] i can come in and clamp this one here and since we put all the screws in along here we don't need the clamps over here anymore i'm going to cut some quarter inch plywood to go around the inside of that frame that we made i had this cut up at the home store you can see along the edge it's kind of uh got splinters and stuff over here so i want to stay away from that side i'm going to use the other three factory edges and this side is the good side i want to put this down so when the circular saw is cutting the blade is coming up underneath and hitting the good side and coming out the bad side because that's where the blowout's going to be so we're going to need three measurements all right one thing i want to do is i want to mark where this is at so i can see that i'm drilling and screwing into here and not out here now as i bring in this piece of plywood that we cut and i get it where i want it i can see that i got between these two lines here to put my screws in and i'll hit that center divider piece depending on your purposes this could be it you could be done at this point if all you're going to do is like put a sink on it like a vanity or put a top on it like a table or a desk or something but for my purposes this is not going to work what i'm going to do is i'm going to put a skirt on here i'm going to use 1 by 2s rather than 1 by 3s and they're going to butt up together like that so that means more pocket screws right there and then there's going to be a lid that goes on top like this so that skirt doesn't slide all the way down it's going to stop here and then there'll be a lid that goes on there to be hinged in the back to open up for access to the garbage cans so i'm going to need to get the outside measurements here the front ones are going to come out a little bit on each side to cover up the end grain of the piece that comes along here just like this one's doing here so we'll get this one for the short side first which is 17 and a quarter cut it a little heavy so now i've got one by's clamped onto each end over here so i can measure the end to end and see what i need so just like before i'm going to cut them with this circular saw drill the pocket holes and screw them together just like i did these all right again since they're one by twos i only put one pocket screw on each end and it just barely fits that's why i went a little heavy with the measurements so it would just slip over there without being too hard it rattles back and forth a little bit but i'd rather have that than too tight so i have a 1x4 here that i'm using as a top part of the cover part this is our 1x2 skirt right here and this is going to mimic the 1x3 that's inside with the plywood that would be here what i'm looking for is about a half inch overhang on the inside that'll cover up the plywood and some of the lip of the garbage cans so i'm going to put a mark right over here take away this let's see what we got here i may just call this an even two from the inside so that'll give us about a one and a half inch overhang from where the skirt is at which is pretty good it's nice and easy to grab and pull off with your hands all right so we know when we're measuring for those overhang pieces that we're going to have one and a half inch on either side which is a total of three inches so if you measure this we're about 27 and a quarter so then we have three inches of that which is 30 and a quarter and then measuring in this direction here it's right at 19 so that'll give us 22 inches all right since we're cutting miters we need these boards to be exactly the same length so i'm lining them up here at one end and take a clamp and clamp them to the two by four underneath i'm going to make my miter here kind of come up to the corner a little bit make my line just so i know where it's supposed to go i'm going to have to reset the blade on my saw and again using the speed square to make my cut straight push this all the way up against the boards [Applause] all right so now we gotta do the pocket holes on our miters here i've got it clamped down here on this end so it won't fall off a little bit of experimentation told me that the first hole should be this corner lined up with this corner and then this edge lined up with this edge nice and flush [Applause] then if i just mark a line two inches from this corner here and that mark will give me something to line up this corner with here and again i'll keep it flush this pocket hole will not be seen from the front over here that's what mainly what i was worried about is that this part here where it starts to drill in would be visible here and it's not so we're good got the apron on here i'm going to be using this little the drill bit that has the drill bit on one side and the screwdriver on the other side looking at this i can go all the way down to where this metal part meets the top of the wood here and that'll countersink into there so i can use one of these screws i'm only going to drill two holes per side since it'll be long grain to long grain i'm going to use some glue and that'll do the bulk of the holding work the screws will just clamp it down nice and tight and now that part of the lid that we just finished slips right on top and it doesn't go down gives us a nice multi-level effect here looking good so far now i just need to work on a lid to cover up the garbage so i've cut out and assembled the frame for the lid here and i've also cut out the piece of plywood that's supposed to go in here but i haven't installed it just yet i need to know exactly where this is going to sit on here because that piece of plywood is cut to go right inside here so this lays flat on the lid here on the top in order to do that i need to know i need to put the hinges in here i've already got them attached i've routed out some pockets to put them in there you can do that if you want you don't have to using a tape measure i was able to set up exactly where i want this lid to sit and i drew little indicators on the back corners here and the hinges are going to be back here the hard part about doing hinges is where do i how do i put these here and make sure everything lines up i'm going to use some well this is gorilla tape this is really good tape to use in a shop like this but masking tape may work duct tape should probably work as well this gorilla tape just works very very well in this kind of application here so i'm going to put the tape with the sticky side facing that way so that way when it's laying flat like that the sticky side is that is up now using those registration marks that i drew in the back corners here i can line the lid up on the top right where i want it then i push down on that tape to get that tape to stick to the top now gently i can open the lid and i can see right where my hinges are at in there i can see right where the holes are on the drill here i've got a center finding drill bit the little spring loaded part that extends where allows the bit to extend past it helps keep you centered on those holes now you just rip them off i've got my whole locations marked all right i took the tape off and i only put one screw into the top that way i can take it out easily when i go to finish everything now i can put this down on top of the lid here and i can take my glue and start gluing up for the plywood on the lid so the glue is only on the lid now i can take my piece of plywood this is my outside so that's going to go down because the outside is on the top i'm just going to drop it down here inside the top push it down a bit get everything in there and you can see how that goes so now the construction is pretty much done now i just need to sand and finish for sanding i'm going to start with an 80 grit sandpaper despite all the effort we put into trying to get these pocket hole joints to flush them flush up sometimes they just don't and you need the 80 grit sandpaper to bring things flush from there i'm going to move on to a 120. both the 80 grit and the 120 i'll only be sanding the solid wood i won't be touching the plywood at that point you'll burn right through the veneer on the plywood if you do any of those higher grit sandpapers and then i'm going to use some water and raise the grain some of the finishes that i'm personally going to be using are water based and they'll cause the grain to raise so it's best to do that before you do the finishing and then i can go with a 220 grit sandpaper and knock everything back knock all that raised grain also with the 220 grit sandpaper i will ease the edges because otherwise if you use a 120 or even an 80 you're going to take off way too much the 220 will ease the edges so it doesn't splinter and it feels good in the hand when you got to move it around at that point you can start finishing if you're going to paint go ahead and paint if you're going to do any type of stain on there you can do that i'm not going to get too much into the finishing aspect here since everyone's going to be doing something different the only thing i want to say is that you want to have some kind of water or liquid proof coating on there whether it's the latex type paint or an oil paint even or if you're using a stain you probably want to go over with some kind of polyurethane in my case especially it's going to be a garbage can cover there's going to be garbage going in there and if anything spills on here i want to be able to clean up easy and not stain the wood so i want to get a nice bunch of coats of some kind of waterproof or liquid proof finish on here in my case that's going to be polyurethane you want to make sure you hit the insides as well you want to be able to get all inside there because water and stuff is going to drip down in there and you want to be able to clean it up easily and not have it soak into the wood and that about wraps it up so uh if you really like this video maybe think about giving me a thumbs up and subscribing down below uh feel free to and leave any questions or comments i'll answer anything that gets left there if you have any friends who want to build something like this feel free to share it with them i encourage you to do so it helps the channel but otherwise thank you for watching and i'll see you in the next one you ...


No comments