woodworking bench plans “+10,000 Step By Step Plans ...even if you don't have a large workshop or expensive tools!“ Click Here...
 woodworking bench plans
“+10,000 Step By Step Plans ...even if you don't have a large workshop or expensive tools!“ Click Here 👈
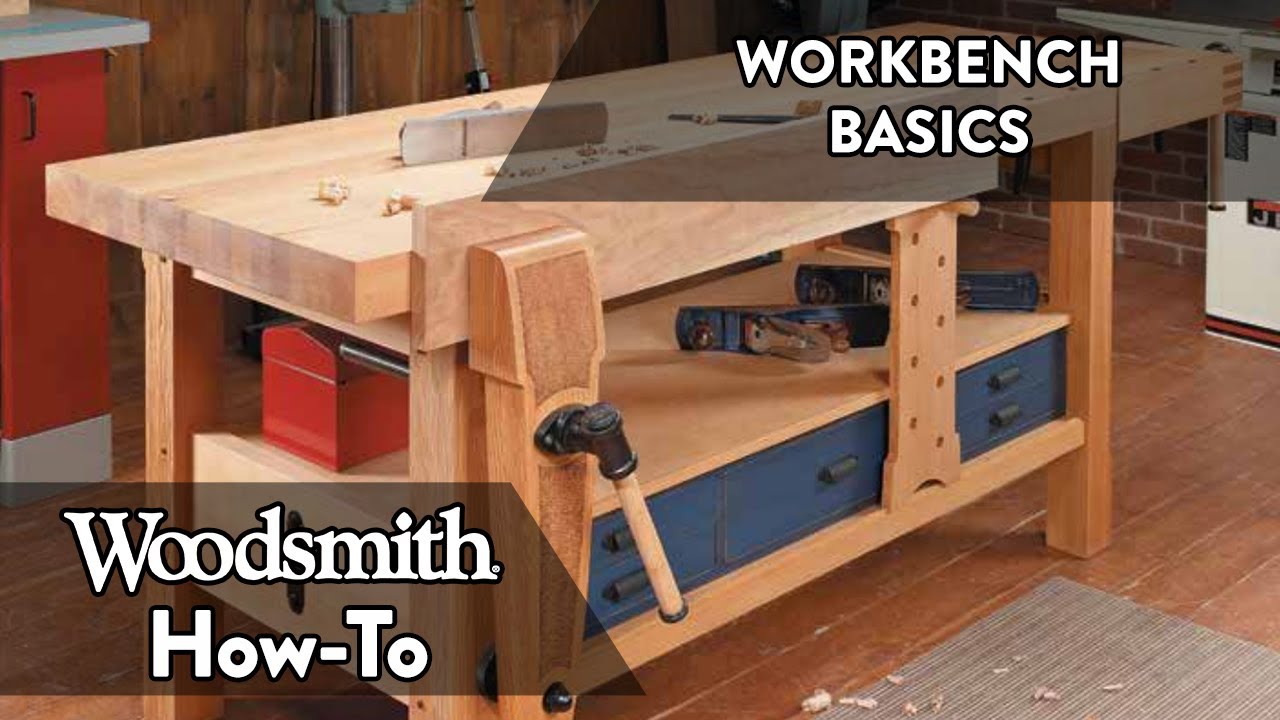
when I bought my first house and finally had a place that I could set aside as a workshop one of the first things I did was build a workbench if you're looking to build a workbench you have some choices you can go with an heirloom style workbench or something that's quick and easy to make but still will serve you for years to come in this video we're gonna take a look and do a deep dive on the construction of a workbench we'll look at the base of a workbench and the top and then we'll look at things like vices and accessories that you can add in order to make sure that it serves your needs thanks for watching all right let's get this topple off okay it's heavy okay well with the top out of the way we can take a look at the base from the bench and issue 200 now it's modeled after an old-style shaper workbench I've got this massive solid wood top support something like that you need a set of beefy legs well you know the legs certainly are large enough to support the weight at the top but what you really need to do is make sure that those legs don't rack back and forth as you're working solve that problem we've installed kind of a wide rail up here at the top and a really wide rail down here at the bottom of course once you connect those rails to these legs you create the end assembly now we have a pair of end assemblies we need to join those we're gonna use some long stretchers and we got one here at the top we're gonna nice beefy one down here in the middle and then of course another one at the front well of course we need a way to hold all these different parts and assemblies together and on this project we use two different types of joinery mortise and tenon and draw bolt now to connect these rails to the legs we went with a traditional mortise and tenon joint now let me show you what that means start out with the legs by cutting these deep mortises and then on the ends of the rails we're gonna create matching Tenon's now they're gonna fit together like this and of course those deep mortises like this give you a lot of glue surface and good mechanical strength but we didn't want to take any chances so to lock the Tenon's into the mortises we use these hardwood pegs but when it comes to joining the end assemblies to the stretchers we took a different approach we use something called draw bolt joinery now that's a great system for a bench like this of course on the end assemblies we have these short rails deep mortises glued and pegged everything it's not gonna see a lot of stress yeah but the distance between the two assemblies that's fairly long and these stretchers if we glue them in place they're gonna be subject to a lot of stress and the glue joint might fail so instead of using glue we're gonna hold everything together with the carriage bolt now here's how it works we're still gonna start with a mortise and tenon joint but instead of a deep mortise we're gonna cut a shallow mortise in the legs and then on the ends of the stretcher a matching tenant oh really this mortise and tenon joint it's just for positioning the work pieces then there's a long hole that's drilled it goes through the through the stretcher and intersects with this pocket now this pocket starts out as a hole that's drilled and then to get this D shape we just chisel it out then you can add the carriage bolt of course a nut and a washer I'm just gonna grab a wrench tighten things up now nice thing about this system that loosens up over time you just grab your wrench and snug things back up this is a great system for building a traditional-style workbench like this but awhile back on the show we built a different kind of workbench why don't we go take a look at that okay all right you got the top off let's take a look at what we have now instead of a normal leg and rail assembly we created the end panels by attaching an l-shaped corner and then glued and screwed an MDF panel to it nice thing is no mortise and tenon joints but you still end up with a rock-solid assembly you know once those assemblies are complete the next step is to join them to become a base and to do that we used two stretchers up here at the top and bolted on two stretchers down here at the bottom now we still want a little bit more stability so we added a pair of face blocks and they kind of create shoulders like a mortise give us a base a lot more stability yeah putting all this together is really simple start by gluing on face block down at the bottom adding on the lower rail and bolting it in place then we'll add the other face block and bolt the other stretcher in place and we're gonna end up with it's a different style base but both of them will create rock-solid assemblies for a workbench top you know Brian a rock solid base is important but the key to this whole thing is the top you know solid sturdy base is great but you want a bench top to match no matter what type of bench you're building but the real key bench top needs to be flat well there's two ways to flat either you glue up a whole bunch of boards and then flatten them or you start with a flat surface like MDF both of those methods are great but working with large pieces and heavy things you know it might be a challenge to build but in your own shop you can do it just a pair of sawhorses well let's get in the shop and take a look at both ways to build the top okay all right well we've got a big heavy flat top on our traditional style shaker style workbench that was in the 200th issue of Woodsmith magazine now and it's a great workbench and a nice work surface this size and flat great reference for building flat square assemblies but you know gluing up all these strips can be have been intimidating especially when it all has to come together in a short time right well the way to start is what we did is just rough cut a bunch of individual strips to lengthen to width and once we get all these strips done then we can go over to the jointer and then the planer and make sure they're all the same width and thickness and then we can glue all these up into a mini slab I've already started that process over here so let's take a look now nice thing with working just a few strips like this I can set them all in place and then put the clamps across the joint lines that'll keep everything nice and flush right and then I just clamp that set of strips together well the key thing here is we've got this resting on sawhorses so you want to make sure these sawhorses are flat and level there's no twist in them because you're gluing up a reference surface your bench top and you want to make sure this is flat so this is flat you know once you've got that set you can glue up all these strips into little mini slabs like this right and then we take these each one of these mini slabs and go over to the jointer and then the planer make sure they're jointed flat and plane the same thickness right once you have all those mini slabs you can take everything put them together and glue things up again just a few joint lines so a clamp across each of those and then clamp the entire assembly once it's dry scrape a little glue off do a little sanding and you got a nice flat bench top well it seems like a lot of work but it actually goes together pretty quick however there is an easier way to do this on our other workbench let's take a look at it [Music] you know I like solid wood bench cops it'd look great on a classic bench it's not the only way to make a great bench surface now for this weekend work bench we didn't win a different route we used medium density fiberboard now what I really like about it it's solid and nice and flat well in this case we wanted a big heavy work surface so we wanted to glue up two of these pieces so we cut them to size and then we smeared glue on the bottom on and then instead of clamping this together we're gonna drill some screw holes and that'll hold it together while the glue dries all right now one thing is everything can slide around once you apply it all that glue so the thing is drill your screw hole small everything's flush and once you drill the screws from back in place pulls everything where it needs to be now with those screws in place that reminds me you want to plan ahead because you're gonna maybe drill some dog holes here along the front edge and along the front vise there so you don't want to have the screws where the dog holes are gonna be or you want to take the screws out after the glue dries right now one thing is this is a great bench top as it is but we wanted a thicker bench top even a little bit heavier so we added these filler strips and they're made the same way as this is right well they give you a little extra heft and support along the front and back of the bench where the dog holes are gonna be and where the front vise is you'll have a row of dog holes along there too so this egg's adds a little bit of extra strength once those are done just set the top in place okay and we'll get the good top the good side up on the top and the only problem with this is that it's MDF so the edges and corners can kind of chip up and get to be a little bit loose because of its MDF right now that's one of the things about MDF but there's a simple solution of solving that problem that's to add some solid wood edging around the edges well just might are those corners and work our way around and glue the edging in place so a pretty simple process for gluing up a heavy flat smooth work bench top for our new work bench bill a solid base and a flat sturdy top like this pretty much a must have for every bench you know that's right but there's another element we want to consider and that's being able to secure a workpiece to your workbench that way it's not going to be sliding all around while you're trying to work on it you know it sounds simple enough but there's a lot more to it than that you know of course a building a project you're gonna deal with a lot of different work pieces from working on the edge of a long board small parts like this and even assemblies like frame and panel doors so you need some clamping solutions that are versatile enough to handle a wide variety of tasks you know for that most work benches have at least one vise but there's a lot of different vices out there they handle just about any need Dave and I are gonna look at a few different kinds of vices the tasks that they're best suited for as well as what it takes to add them to any workbench to take full advantage of a rock-solid base and a beefy bench top you need a way to secure a workpiece to the bench yeah you know you could use clamps to do it but a built-in vise is a whole lot more versatile and has a lot stronger grip you know just like the basis and the bench tops that we've been looking at so far there are several types of vices that you can use and they're gonna vary depending on where they're located on the bench as well as their function right you can see on this bench we've located the vise in the most common area right at the front corner and in this case we've used a vise with metal jaws this one even has a quick release lever that allows you to slide that vise right open the main advantage of a vise like this is just how easy it is to install all you have to do is just bolt it to the underside of the bench top yeah and then to prevent the metal jaws from marring your workpiece we've added a long wooden face to the front and we've buried the back face in the bench top now for most woodworking tests that's going to work just fine because it allows you to clamp even long work pieces right to the front of the bench for working on them but you know to take full advantage of a vise like this you need to add pegs that are called bench dogs but the dogs allow you to do is secure a large work piece like this glued up panel right to the bench top get it clamped in and that's not going anywhere and for a simple workbench like this adding the bench dogs is really easy all you need to do is drill a series of holes in the vise face and in the top of the workbench yeah and to do that all you need is a three-quarter inch spade bit and what's nice is you can drill those dog holes anytime even after the bench has been built all in all it's a great way to add some versatile clamping options to any workbench but like I said there are some other ways to do it too and for those we're gonna take a look at the traditional style workbench let's start at the front corner of the bench just like we did before but on this bench instead of a metal face vise there's a pretty cool looking old-fashioned wood leg vise yeah and this vise works a little bit differently you can see that there's a metal screw that's attached to the leg and that allows you to open and close the vise at the bottom there's this metal wheel and it acts as a fulcrum when you close the vise and it's adjustable so that you can fine-tune the clamping pressure based on the thickness of your workpiece now this kind of vise is used primarily to secure a workpiece to the front edge of the bite of the bench just like that of course you're gonna have other clamping needs and that's why this bench has another vise at the end this end vice is appropriately called a tail vise and it does have a small face that you could use to secure workpiece but that's really not its purpose the tail vise is to hold panels or long boards in place on the bench top using bench dogs now you'll notice that these bench dogs are quite a bit different than the round ones that we showed earlier these are square so that means they're gonna need to fit into a matching square hole in the bench top now obviously you're not going to just drill those holes so what you need to do is incorporate the dog holes as you're gluing up your slab here's how that works on the last strip for the slab I cut a series of notches that match the shape of the bench dog now when that strip gets glued to the slab like this it completes the hole now you notice though that the holes aren't just square actually shaped to match the dog so that when you want to you can recess the dog below the surface of the bench top and they have to be laid out with consistent spacing and AB Nangle now the way to do that is to use a handheld router and a template now the template is sized to match the shape of the bench dog so to use it you'll just lay out the dog hole positions on that long front strip then you can drop on the template align it with your marks and then you'll use a screw to hold it in place and you're ready to rout now on the router I installed a pattern bit that has a bearing on the shank end and that bearing is going to follow the edge of the template to create the notch they're going to route out the notch in a series of passes lower the bit between each pass to create the shape well fill that really works great you know so whether you're using round or square versions it's easy to add dogs to a workbench and when they're combined with a good set of vices you can use your workbench for all kinds of clamping tasks having a vise or two on a workbench is a great way to hold onto work pieces and with all the choices available you're sure to find something that suits the style of projects that you build you know you're right but vices alone don't make a great bench in my book you also need space to store all the tools that you use while working at the bench whether it's small items for layout fine hand tools your bigger tools or bench accessories you do a lot at the bench and it's nice to be able to keep that stuff there instead of having to traipse back and forth across the shop all the time I think it's a great way to customize a workbench too you can add several different types of storage to the space below your bench top yeah there's a lot of options and just like building the bench itself the storage you incorporate can be simple it can be a little more complex I'm gonna go join Terry and we'll take a look at some of the options well Terry I see you're getting some storage built into this bench that's right we've added a small cabinet down below it's got five drawers and it just slips in this place and rests on the lower stretcher then we went ahead and added a plywood shelf on top of that well and that's really nice because it gives you that enclosed space for fine tools and smaller things but that open shelf area lets you fit tool cases and bigger tools without problem and I like having a little bit of open space underneath a bench top allows me to reach around push up a dog if I have to plus if you ever want to clamp something you can reach under with the clamp get it in place you got plenty of room you know storage is one of those things that you want to add to just about any bench because you're always gonna need a place to put your stuff well and that's one thing a few seasons ago when we built the weekend bench that we didn't include but we've solved that problem let's go take a look what when it came time to adding storage to this weekend workbench we took a slightly different approach instead of at building a cabinet we started by adding a couple of vertical dividers which you could add to virtually any workbench and between those dividers we have a bank of drawers slip this one out you can see that they ride on runners and we've added dividers that you can place inside the drawers to keep Hardware and screws separated and you can add deeper drawers that give you space for tool storage just like the bench the whole storage unit is built from MDF and construction lumber so it's a great way to make a hard working bench work even harder if you're ready to get started building a workbench for your own shop you'll find the plans for both of the benches featured in this video at Woodsmith plans dot-com there's also plans for a number of other ones so you have lots to choose from and you're sure to find something that's gonna work right for your workshop thanks for watching ...


No comments