woodworking table plans “+10,000 Step By Step Plans ...even if you don't have a large workshop or expensive tools!“ Yes, Get A...
 woodworking table plans
“+10,000 Step By Step Plans ...even if you don't have a large workshop or expensive tools!“ Yes, Get Access To 12,000 shed Plans! 👈
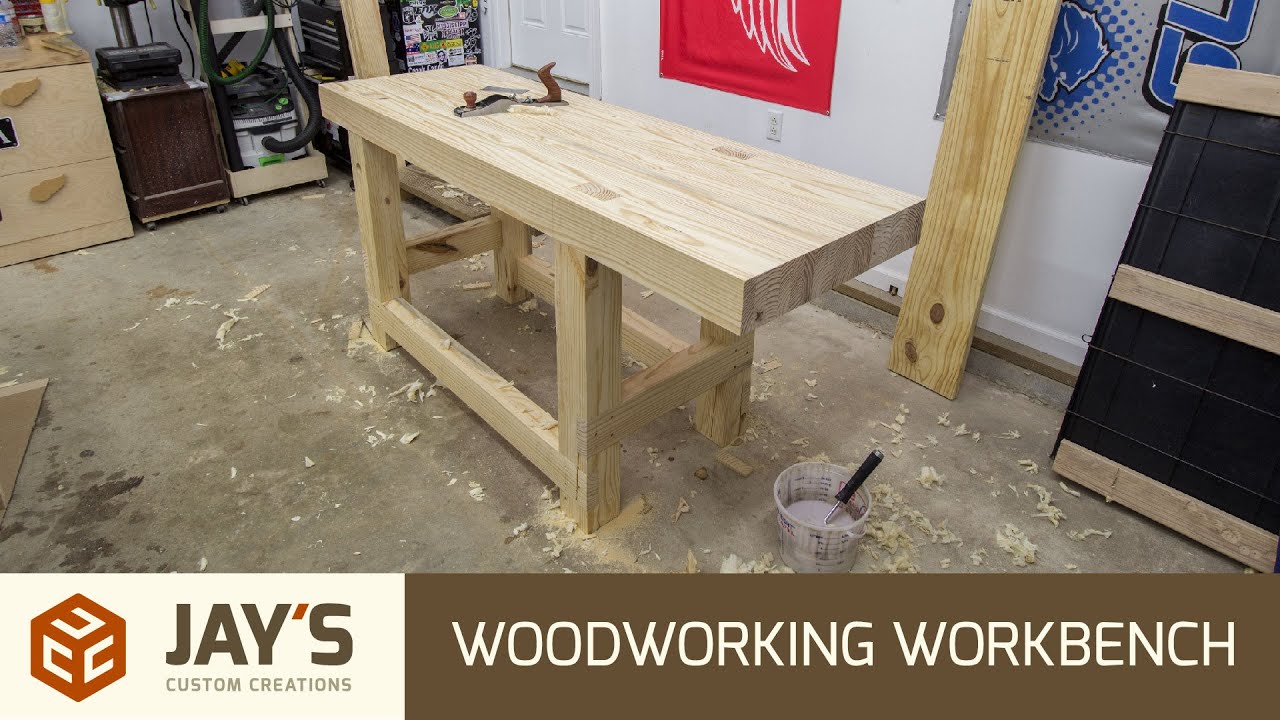
it doesn't matter if you have power tools to make the job go by faster or you want to work with nothing but hand tools and not even any electricity anybody can make this workbench remember glass half full not glass half empty now this was made with readily available materials I used nothing but 2 by 10 southern yellow pine boards to make this entire workbench and it set me back about 110 dollars for the wood the bench itself is about 6 feet long it's about 2 feet wide and it's got an over 4 inch thick solid wood top that's made to take some abuse for those who are interested I do have a set of plans available to walk you through step by step how to make this workbench it has three different vise options and a 4 drawer cabinet that will go down below as you can see I don't have the vices mounted or the cabinet built that's because there's only so much crap you can cram into a 20-minute video I'll get to those in the next video so let's get down to business and I'll show you exactly the steps I took to make this really solid workbench just like most of you out there I can't really justify spending about a thousand dollars on some really nice hard maple for a workbench so instead I'm using a very good budget alternative which is southern yellow pine the workbench build starts by making the top assembly and that's because some of the base dimensions will be derived from the completed top assembly and I'm going through all of my 6 foot long boards to pick out ones that have really clean edges along their full length and that is because each one of these boards needs to be ripped in half and then stood up on end to complete the top assembly I'll need about 5 really clean boards or boards that are clean on the end and that way once the bench is all glued together and completed I'll have enough material on top to plane away and get a nice flat surface without having any knots showing through on the top side so once these boards are ripped right down the middle then I'll go ahead and start the milling process for at least three phases to get this somewhat more manageable before I put it in clamps i bypassed the jointer and just skip planed all of the pieces that will make up the workbench top and now I'm gluing them together in three individual beams once these beams are completed then at that point I can run them through my jointer and planer and table saw to get them square four sides and then glue those three beams together to make a pretty flat work bench top before assembly so that way once it's all done there won't be much flattening needed now as I'm gluing these together I'm making sure that each beam has all of the pieces bowed out at the middle and that will that will create a natural spring when you glue these together that way I can focus more of the clamping force directly in the middle and the outsides will be naturally sprung tight to begin with and I'm also using two dedicated coals for each side of these individual glue ups and that's because the clamps that I'm using are going to Mar the surface up and that way they will damage the coals and not my actual workbench top material after gluing up all the sections that will make up the top I started squaring them at my jointer starting with the large face that will eventually be the top of the workbench and this will reduce the amount of hand planing once it's all completed after that I squared up both short sides connecting to that top surface now typically we wouldn't do both of these faces however these are pretty darn parallel and flat to begin with so I don't think I'm taking them out of parallel much and if I am it's a very insignificant amount that really doesn't matter I this is a much better approach than running the full beams through the table saw flipping them over it's just not really manageable that way after this I can run them through my thickness planer and I'm only using the thickness planer to flatten the bottom surface of this top assembly for each one of these sections and that's because there's pretty much no way to get around having some type of snipe on the the beams this size as they run through the planer so if I am going to have any snipe I want them to be on the bottom surface of the workbench where there will be a lot less noticeable and they really won't even matter I've milled the top section squared four sides everything's nice and flat so the glue up should be relatively uneventful however I don't want any of these to slip a little bit and cause a lot more planning to be done on the top surface so if you do have a biscuit joiner now is the time to use one I do not have a biscuit joiner so I'm going to use floating Tenon's in the same way that biscuits would be used once all the floating Tenon's are in place and slap some glue in the joint and clamp everything together it should go together nice and smooth without any hiccups and I'm looking for a nice even bead of glue squeeze-out in each one of these joints the top is completed and I flipped it upside down all I need to do is finesse the top surface once it is complete that's all that's left to do with this particular part of the workbench this turned out very heavy which is good it's exactly what you want in a workbench top however my original intentions were to move this to a set of sawhorses and build it upside down from there but I think it's going to be easier for me to manage if I leave it here on my assembly table I finished my humble table with polyurethane so while it is really heavy it is a lot more manageable on here than what I think it will be on some saw horses so next up is to build the legs I needed to go through the milling process for the legs and then cut some Tenon's that will eventually fit into some mortises on the bottom side of this top you with the legs out of the clamps I'm using my jointer and planer to square the legs for sides and then finally cut the legs to their final length at the miter saw the legs will attach to the top with a through tenon and to cut this tenon on the end of each legs I'm going to make my final passes with the table saw but I want to hog out the vast majority of the material with the bandsaw first I can't make all of my cuts my finished cuts of the bandsaw because my blade is really dull and just not cutting that great I've got the workbench top upside down so the bottom side is facing up and I've already determined where the start point for my legs are going to be the the base assembly is not going to be centered it's going to be offset to one side so I'm starting with the short side and I'll work my way from one side to the other marking out the locations for the legs making sure to establish the appropriate distance in between the legs for the base cabinet that I will eventually put down below I've already established the start point of the leg and which side of that line I want the leg to be on so I'm just going to use the tenon itself pushed up against the top to mark the other side so that is the start and stop locations for the mortise now the mortise will eventually be or the leg I should say will eventually be like so and the inside distance here how far the mortise will start from the edge of the workbench is equal to the distance of this shoulder right here so we're going to rotate this down and use the shoulder itself to let me know exactly where I want the mortise to start and then the final dimension the opposite side is equal to the total width of the leg so I can slide the leg in place lining the backside up against the other side of the workbench and just strike a line so this in here needs to be hog tout I'm going to mark this on all four the Tenon's on both sides of the workbench really quick I hugged away the vast majority of all of the interior space for each one of the mortises with my plunge router you can use a drill bit and drill you could use a chisel and to get all this stuff out of the way but this has dust collection systems throughout I chose now I did not go to the line at all on any one of these mortises and that is because I wanted to attach my my edge guide here and that will allow me to establish this nice clean perfect outside face for each one of the mortises with one set up so I'll go ahead and cut all of these appropriately and make sure that there are they are all perfect before adjusting the base once more for the inside face of all of the mortises and then I'll just repeat the process for that and trim up the end grain sides of the mortise with just a regular chisel and a mallet I finessed all of the legs so they're fitting in the mortise is just fine one of them is a little bit less than perfect but that's okay they're all going to be wedged from the top side once it's all assembled before assembly though I don't I do want to make sure that I drilled a hole for the leg vise and I'm going to do that right now just so I don't forget about it up next I'm going to cut and make the joinery for the long short and short stretchers then I can glue this thing up and start start installing some vices I just milled up the beams that will make the long and short rails for the workbench base now I'm using half lap joints to connect everything so I'm going to cut them on the beams first the long and short stretchers whatever you want to call them and then I will mill out the appropriate joint locations on the legs now I've already made sure to mark the appropriate spots for these joints because for me getting this far in the game it's very easy to get mixed up and cut the wrong joint in the wrong spot so hopefully that will prevent me from doing so to cut the matching half-laps on the legs and starting with the short rails and the first thing is to line up the fence so that my dado blade the outside of my dado blade is lined up with my start line with the blade on the cut side of that start line once I have this position the way I want it I can make the first cut on all four of the legs that will that will make sure that the the half flaps are in the exact same spot on each one of the legs then I can hog out the majority of the material on the rest of the legs making sure to stop about a quarter of an inch shy of where my final cut needs to be I can move the fence and dial this last cut end absolutely perfectly and once the fence is in in the appropriate spot then I can make my final cut on each one of these legs to make a perfect half lap on all of these at the exact same time then I can repeat the entire process again for the half laps for the long rails all the hard work is done all the joints are cut and they fit and I have it all clamped together in a dry assembly these joints will eventually be pinned with oak dowels in a couple days or so but for right now I'm going to pin them with screws and the screws are going to be used as clamps so that way this thing can hold together as it dries as you can see I don't really have a good setup to clamp this thing long ways so I want to get the screws driven first before I add any glue that way I can remove the clamps and then just use the screws by themselves they'll go back into the holes that were previously made and the screws will be the clamps to hold it together as the glue dries once the glue dries then like I said I can come back in a couple days and put the oak dowels in their place I was able to lift the workbench top off of the legs by lifting up on side and hitting the leg Tenon's down just maybe a half of an inch or so and then putting a clamp underneath it to prevent it from going back down going to the other side and repeating the process till eventually I had the work bench top sitting on top of the leg Tenon's just freely sitting there so gluing it up is going to be a multiple stage process I'm just going to glue the legs into the work bench top first and I'll do so by putting a bunch of glue way more glue than what's necessary inside the mortises for the legs and then I'll gently slide the top onto the leg Tenon's and then from there once all of the leg Tenon's are just started I'll go back and forth from side to side lifting up the work bench and slamming it down using the weight of the work bench to properly seat off all four of the leg Tenon's making sure that these shoulders are nice and tight and that the Tenon's are all the way through once that's done I'm going to use some small wedges that I cut at the bandsaw just just scrap pine wedges the same materi I'm using for this workbench and wedging the sides the short sides of the tenon making sure it's nice and tight and everything is nice and glued in place and now that the workbench top is properly joined to the legs I can remove the screws from one structure at a time insert glue into the joint put that particular structure back in place and use the screws to clamp it all down once all of the joints have had a proper amount of time for the glue to dry I can come back with a flush trim saw and cut all of the joints nice and smooth on the top surface only is where I'll use a hand plane to make the Tenon's flush with the top surface I'm not too incredibly concerned with the base at this point so the construction of the actual workbench is now complete and I'm very happy with it is it perfect no it's not perfect there's some flaws here and there but I really don't care because it is solid and that's all that matters I didn't build this benched if you have something pretty in the shop that you can't really work on because you don't want to mess it up this is going to take abuse and I'm going to abuse it and it's just a big heavy work wedge I don't know the exact weight but this thing is heavy enough where it's not going to move when you're working with hand tools on it at all but it is light enough to where I can still manually push it around the shop if needed all of the legs are the same length but it's not level on my garage floor because my garage floor isn't level no matter where you push it it's going to rock just a little bit so the quickest solution for that is it just kick a shim underneath the high leg and that's good enough the final dimensions are one half of an inch shy of six feet it's 23 and a half inches front to back and the top stands at 34 inches off the ground the top itself is 4 and 3/16 of an inch thick and the legs are 4 and 8 by 4 and a quarter I do have plans available for this like I said and the plans go into detail for the workbench itself plus three vise options as well as a full cabinet to go down below with four drawers so that's it for this video I will cover the vices and the cabinet's later thanks for watching hope you guys enjoyed this I had a lot of fun here in the shop making this and I'm looking forward to putting it to use so you guys take care have a great day and I'll talk to you next time you you ...
“+10,000 Step By Step Plans ...even if you don't have a large workshop or expensive tools!“ Download Today! 👈


No comments