woodshop workbench “+10,000 Step By Step Plans ...even if you don't have a large workshop or expensive tools!“ Download Today! ...
 woodshop workbench
“+10,000 Step By Step Plans ...even if you don't have a large workshop or expensive tools!“ Download Today! 👈
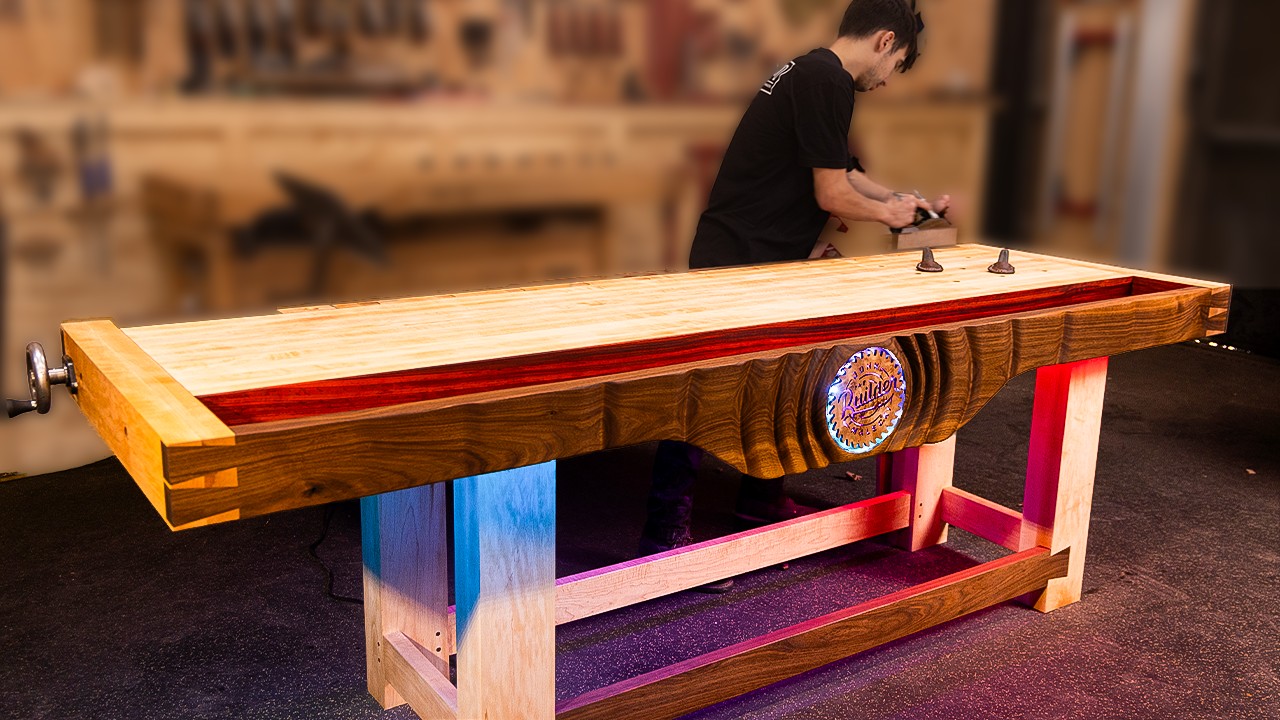
but I don't know if we're dead in the water yet we'll see a few years ago I built this and you guys were pretty big fans of it but since then I've gotten much better as a builder and I got to say she's seen some better days so we're going to fix it but instead of fixing it and then never telling you guys about it I'm going to build my absolute dream workbench and don't worry we're not getting rid of this one we're going to just keep it back here where we have this and actually we're going to give this sucker away I've had this for years and it's phenomenal and stick around till later in the video and I'll tell you how you can win it for this new work bench we have a bigger shop and I'm gigantic so we're going balls to the wall huge with this sucker we're going to build an 8ft workbench by 30 in now we're going to have 24 in of work surface which is what we have now and I'm going to use a little bit of a different mentality on this bench you see the world is changing and technology is improving a lot of our lives so why hasn't it improved the workbench yet and so that's where my new ideas are going to come in okay so you can see the workbench here this is looking pretty awesome first thing you're going to notice is is that I have this kind of apron on the front with this drop down here we're going to be putting my logo right here because I use this bench so much and we're a studio that it'll look awesome and I've also never seen it done like that before so why the hell not we're going to back like that with LEDs that'll run under the table and mount down there now for another feature to kind of give it something I like is I love a through dovetail so we're going to do double through dovetails on all four sides and we'll do a walnut piece on the front and back for sandwich the end caps here will be toned on then we have a tool tray here that's about 6 in deep I also left the tool tray front thick because I'm going to do power carving on this because it's kind of my style it's something I think will be a lot of fun I look really cool and unique and nobody else has done anything like that to go with it I'm also going to carve the chop I have a kind of a general idea I want to kind of keep it organic I'm not quite sure what these are going to look like yet when they're carved that's more or less the gist of it been working on breaking down the materials first and foremost to get them into more manageable pieces for Milling I always suggest this it makes it so much easier especially with a heavy dense wood like hard maple it's going to be your standard procedure of Joiner planer table saw getting everything kind of milled up and ready for gluing I'm going to glue this thing up in Parts we're going to start with the top I'm going to get all of the top glued up as best I can oversized except for the end caps on both the long and the short sides those will come after because I'm going to have to cut some joinery I'm blessed to have a 25in wide planer so I can do this in one shot but if you're going to build something like this on your own you should probably do it in smaller glue-ups to fit your planer make sure you're being cognizant of that also if you do want to build this on your own we do have a detailed plan available for you to build this thing Bare Bones without the tech I've also made sure that the plan was spec to be able to use construction grade Lumber because I do realize that in today's market Hardwoods are absurdly expensive everything in the plan can be built from construction grade pre- dimensioned Lumber all right so we're dry I had to bring in the muscles to help me get these things out of the clamps she's thick she thick oo that sounded solid everyone come over here give it a whack Chris and I are going to throw this on the CNC just give it a skim pass I could do it by hand I'm not a real woodworker and it only needs a little bit it needs like an 18th to make it perfectly parallel then we'll cut it down the size you want to build big boy stuff you got to have big boy tools at least that's what I read in a magazine before I spent a bunch of money on tools all right let's [Applause] go well the deflection wasn't terrible but the tear out is not what I was looking for that could have been way worse let's see how Square we stayed out a little bit down unsquared my Square we're out about that's what I hate about that saw the good news is we're going to be cutting a 1 in 10 in here and so all of this will be coming out the legs are out of clamps as well and you can see they're still pretty rough I'm going to join them and pl them down to size in the plan I have them at a 3in width but I got so much more yield out of my materials I might beef them up to a four or close to as four as I can get but I've got to clean them up first to see what my yield is going to be all right so for the fourth leg we need to make that sucker Hollow so we can run some power through it the best idea I have is a locking miter and this thing kicked mine and Sam's ass for hours but we finally got it dialed in look at this bit just look at it this thing is insane and I know you're all staring at my router table right now and yes we do have a plan available we have lots of plans available there'll be a plan for this workbench available hold your horses we're going to run this through here get that glued up and then we're going to start working on the top s it I wanted to cut that [Music] out that looks like a box huh room for all your electronic gizmos and dads nice hidey hole nobody will ever know that it's not completely solid like this except for the 1 million people who are going to watch this video cute it's all you need just need a massive workbench the size of Bigfoot glue her up I like to leave those little hairs in there as a reminder that I'm a cheap ass it buys like the cheapest acid brushes so for this workbench I went with the benchcrafted hardware it's pretty badass I've always been a fan of it I've already got Andy Klein's twin turbo Hardware so I pretty much was like I got to get the next awesome Hardware that's out there on the market so it came with this like awesome tube rolled rubo plan I've never thought about it but like it'd probably be pretty cool if my plans came like this hurry the hell up I got awesome I want to show you I think he lied to us Joe I don't think he can hear he never wears ear protection I wanted you to have the honor of opening this all right I know he's a man who appreciates a nice machined shaft look at that probably the most gorgeous shaft I've ever touched wow these are the end caps they are dry so now I need to Mill them to final size they'll go on like this we'll have our tool tray here and this thing is going to be big I mean real big so my first big boo boo of this build is this I I forgot to look at the instructions for using this wagon Vie this tail Vie from benchcraft so I have to actually have a gap on the edge of my bench I'm not going to get into the details on building this and putting this together these plans are absolutely phenomenal but I forgot it so I got to cut a chunk off of my table my material is 2 in thick anyway and I believe that they have a the dogh hole strip on here is 1 383 it's a 1 and 3/4 total thickness so should be able to easily just cut this off here and we'll be good how many times you think I'm going to have to flip this thing two 300 I'd say 17 more [Music] time do I have 12 other saws that could finish the cut probably am I too lazy to grab them absolutely hey there we go 10 in is next I'm going to cut the 10 and hole and then we'll size it down to fit the Caps we'll do this mostly with the tracks saww it'll be the EAS easiest way it's pretty much what I've noticed like everyone who has a tracks on builds a table with a tenant on the end does and it seems like the easiest and most efficient way now for the fun [Music] part he sampa but he need help he's saming Pula you know who that is so I'm following along with the recommendations for the hardware that's it first so I got to Route up pocket and so I just clamped my straight edge I'm going to come set all my depths and stuff everyone else gets all fancy with this but I think I can get it done being a little bit more of a rudimentary redneck idiot woodworker a little bit hair out this has a bearing on it so once I get down to the last pass I'll be able to come make a nice flush cut and we'll have a stop I've got to get this 10 in to fit inside this end cap and I got to do it with the outside piece here as as well as leaving the space for the tool trough over here so I think I'm going to cut the Tenon down slightly leave a little bit of relief in it we want all of the movement to go towards our tool tray which is important here a little bit of thinking a lot of bit of chopping don't know what else to kind of do so I'm just going to kind of do it and hope it works you can do [Music] it can call it on the router slipped while I was just cleaning up this face and burned it in there like fortunately I got enough meat I'm G to be able to just level it out but like yeah look at [Music] that piece of the words of my great grandpappy mother Jones how's that Jones now be perfect the whole point is to get this line tight and I learned on the last one if I could get that first first bit to be good then' be good [Music] period the wrong I was looking at this and I was like I 10 it ain't centered at all this supposed to be like this so that Mark's actually supposed to be right here so the easiest way is going to be square it up hog it out put another piece in and then recut that mortise over here so that's what we're going to have to do make it more work that'll be faster I think than regluing a brand new block I think it's seated I'm Ron Burgundy that'll do so to mitigate my screw up I'm just going to flip it I was going to have this part facing down cuz I liked the grain better on this side it's either that or I'll see this in the tool trough so I think we just go with the clean part and I'll mark it accordingly and then this time I know that it's appropriately centered because this is the bottom Tenon has a better Fit already so this whole time I've been struggling to get this to line up stay flush that Gap right there cuz it's flush on this side top to bottom the problem it's that a square on on that side this side too a little bit this sucks all right we got to do the the bolt hole here what did he which if I land in the center I kind of marked it out in here it's going to come out inside the Tenon which is what we want I'm going to drill the pilot hole in the endc first and then drill in I don't really know what I'm doing but I kind of know what I'm doing but I don't know what I'm doing go me I'm just trying to make a a good Square line well it's going in I just got to go a little deeper there we go that makes me happy okay it's tightening yeah aart wo okay friends meet the new employee in the shop this is a 1950s or 60s Delta 14in radial arm saw I'm pumped because I literally bought it so we could do this check this out I essentially wanted to get this tool just to cut stuff like this what I'm going be able to do is cut this dub tail top here and then I made this cool little jig that will allow me to once we're done with those I can come in pop this up it'll perfectly cut the center and then I can flip it cut this Center too and I don't have to adjust the height of the sof our boy Mr Dusty Lumber Co makes it all look so [Music] easy up next I got to clean these up to basically just finish these cuts by hand I got to remove this and then this side and then chop that out beautiful the whole point of this is that the the blue will be where I don't touch with my tools that's the part we keep I'm going unconventional to cut these I'm going to use a tracks saw right and what that'll allow me to do is essentially just get a nice straight edge on that shoulder cuz I'm really bad at cutting shoulders and I know my weaknesses if I do it like this I can cut that shoulder with a clean pass and it'll be perfect right off the sawt I think this is only doable because it's a full through Tenon by the way I'm going to come in with the band saw to make some relief cuts to hog out this waist here start breaking we'll just go with the good old fashioned coping saw the way you'd remove it if you weren't a clown like myself let's test this okay I got to say I've never made a joint this big before this is immaculate man it looks awesome is it perfect absolutely not but a little TLC oh man that's going to be great the other three definitely got room for improvement there so I could put the vice in but I'm getting a little antsy I think I want to cut the other Dove tail on the Chop on the other side next we are looking at the other side of the workbench and for this I want my logo to be displayed in the center of the table how can I make this look pretty cool still and do something a little different function the way I want it to and be like a showpiece for the shop so I'm going to lay out like where I think the logo will be I'm going to power carve everything on the front and on the chop leaving where the logo sits FS by itself I don't know I like that I think I think that's what I want all right forgive me I'm in here working by myself I forgot to turn the camera on but to get these uh perfectly cut to where I wanted them I just used the table saw and I ran what's called a stop cut see a little board there stopped once I touched it turned the saw off and repeated that on both sides now we're going to cut the center part Out rough on the band saw looking sick we're ready to cut the pocket here for my logo so here's the vision for it we've got the John the Builder logo boom boom but to make it even more awesome I want to carve this front it'd be cool if it looked like a drop of water and it kind of like bubbled out from the edge I feel kind of crazy right now what the hell is John doing so more or less it'll just be like a wave coming back in out of of the center so in between all these would be low spots and it'll just be like wavy before we do anything though we need to cut that pocket and then we got to cut the recess for it's going to be our tool tray underneath and install our Vie Chris is going to run the CNC to cut that pocket and while he does that let's put the vice in oh you I'm sorry I cracked it two days ago oh thank God no one can handle the nerves P cannnot handle those nerves it's okay cracked with grain I totally planned on fixing that as the table sits this is where the hardware will live and it's sliding the next thing that needs to happen is I got to drill the hole for the rod this comes with on the template what I should do is take this off and go over to the drill press but we're not going to do that cuz I like to live life on the edge so we're just going to send it yeah that looks about 3/16 time to do some sketchy you're wondering why it's burning because that's at an insane angle looks hideous on the inside does it matter that should hold itself now D I might die from Maple inhalation on this project I mean I'm pretty sure that's what it's supposed to do all right so Chris just burned this it'll look so much better with finish I forget how like busy my logo is but this is a cottonwood Burl we might even backlight it but before we do any of that we're going to cut our slot for our Shelf inside of our trough here we've got the tool tray the piece for the insert is installed I'm going to line this I think with a special wood make it pop a little bit more I need to carve this part still and then we'll get everything kind of Flushed up here more or less the top is like 90% complete so we need to get started working on the base so I have something to put this sucker on we're going to start out I'm going to cut all these leg Parts down to size and then from there we'll do some joinery and get it put together I'm so stupid I modeled this off of like a normal person's bench and I'm 63 forgot to make it taller that one's like 40 in tall this one's is going to be probably like 36 37 I was designing it to make sure the plan worked for every for like pretty much anyone and uh that backfired so for the joinery method on the table base we're going to do a classic mortise and 10in with a draw Bo pin so this is our 10 in here I'm going to cut these on the table saw it's too bad that I don't have a big bet stack yet for the radio because that would have been a lot of fun to do these parts are small enough and they're nice and easy I'll cut the shoulder first and then flip it cut it flip this up relieve it and I'll all four tenons cut and then we'll go ahead and start working on the mortises this will pretty much be the same thing for all the mortise and tendons that we're going to do here we're going to rough cut with this wood out bit this thing's sick it gets enough throw we need to go 2 in deep you'll see how fast this will make this work and then I'll clean them all up with chisel and [Music] router trim it up more pretty strong joint come on I'm glad glad for its last harra this workbench is getting some good work eight more to do that is tight yeah kid dreams his whole life of being a woodworker professionally and then a nice tight mortise in Tenon doesn't get him fired up I don't know if he was built for this world cuz it gets way far up this is my max level of enthusiasm I well you should fix it sturdy nobody knows what he's doing I'm just waiting for you to go I don't know what I'm doing can I have some help I know exactly what it is you put the BL on backwards oh teaching moment my favorite you ready for my excuse Joe never used a d stack this nice before my Harbor Freight ones you can wow wow you can switch your outside blades I'm the idiot who HED him though so who's getting it here looking [Music] good all right this thing is coming along and it is looking amazing last few things to do we've got to get this chop done and then I can finally get to the stuff that I've been really looking forward to which is going to be adding some little touches that are 100% John Miki so I'm stoked for that let's get to it got to give this a minute to dry and before we go any further I want to tell you about this week's sponsor Factor owning a business being a dad being a YouTube trying to enjoy my life and everything else going on has me crazy busy because of that I've been actually eating factors for months this is one of my favorite and routine hacks that I absolutely love and tell everyone about factor is a service that ships fresh meals directly to your door they've never been frozen and they're absolutely delicious it's so easy to forget your lunch and then run out and grab something spend like 20 bucks on it and need 1,000 calories and think nothing about it you literally go on the website you pick the type of meal that you want you input it to be delivered to your house or your Workshop or wherever you're at it shows up in a refrigerated box at the peak of freshness and all you got to do is poke a couple holes in it you can throw it in the microwave and it's ready in 2 to 3 minutes so I get variety and I kid you not I am not lying at all when I say this they're delicious so if you're looking to save some time and get some unbelievably good delicious meals no tend you cut it with a fork you've got to check out Factor head to factor75.com or click the link below and use code John M50 to get 50% off your first Factor box and worth every single penny I promise you thank you so much for sponsoring this build now let's get back to this thing cuz it's kicking my butt the maple cut the walnut's done we do want to make the veneer for the inside so we've got these two chunks we'll put that in between and then when we back bevel it and I'm actually going to carve so if I can carve like into the red and show the red that'll look really rad in between like that and the maple give me a lot of depth to play with then cuz we'll be like three 3 and 1/4 in deep if if you're not subscribed we're not going to be able to show you what's going on right here but it is ridiculous and potentially 16 ft long so hit that subscribe button we're almost to a million why wouldn't you we're going to cut it to size I'm going to put it down with contact cement so we don't have to wait in the veneer bag for 2 days and that should be fine it's time to potentially ruin the entire however many weeks I've been doing this project by ing it I figure why not all of us here in this Factory of morons believe this is a good idea what could go wrong right it's just just the feature part of the entire build so ain't nothing to it but to do it let's go [Music] [Applause] people I don't hate [Music] it I don't know right now I really don't like it the vision is there yeah I think I need to go deeper in here oh I don't know guys I don't know I don't know I don't know I don't know I don't know I like it I think it needs a lot of softening I think for this concept to look the way we're envisioning it do a little more with the die grinder and then I think I'm just going to have to like bring it home with the sander is out right now I'm feeling really anxious about it just not looking good I don't know maybe it'll look better once it's on the bench there's nothing quite like getting super far into a build and effing it up with some stupid idea at the end but I don't know if we're dead in the water yet we'll see Rotex 90 baby let's go save my [Music] ass I think it worked go team it looks Wicked on camera it's going to look so good got to get deep in the crevices of the Walnut to truly appreciate the can you please gosh first it was just ruined a wholesome moment all right well John's sanding that uh we have some of our bench dogs over here I have mil these out of some Maple it's a 38 inch roundover bit on the corners Joe and I just got done marking Center and now we're going to take them in the drill press and drill out for our popup Hardware this little popup button what one of the popups made out of Walnut oh no well I we're set up to do it I know what to Mill it to you want me to looks like you're fired we are trying to lock the Tenon in on the side that has the vice so we don't get any expansion that makes the Vie not really want to work [Music] right happy birthday cus that doesn't look like go it looks awesome theke actually is gnarly all right everyone good morning got this sucker out of clamps looking fantastic I cut some of the strips that we're going to be using for the rest of the lining of this I want to get this in so it can dry while I work on the chop they're just a little bit big and so to get a kind of a perfect fit I'm going to shoot them in the place with my shooting board which is over here it'll give me an opportunity to get a nice perfect mitered Edge on this side 45° here this thing's rad I built this years and years ago been so long I'm like forgot how to use this which now that I recall it's this way so you pull it into the fence so now it's time for the chop in the leg this is going to be the last like major assembly component everything else will be small detail anding that kind of fun stuff how important is this no this is this is it like this is the Moment of Truth for the whole freaking everything could be misalign I could be losing hours so we will see gosh this is annoying it's funny though who used this last before me it's an interesting way of phrasing it see that guilty conscious I was the last one of use it before me you could hear the sigh I guess we could go use the metal one these drill presses are killing me all right we got the job done was it pretty no is it done yes assembly time at least testing all right so the unfortunate thing about this is I have to put it together and then take it apart before I can shape the chop just got to make sure all the action works and everything which more or less terrifies me so lazy pre-drill I believe this goes here this has to go like this so we'll get this started that one went perfect this one's kicking my ass many unbearable hours later I don't have it like absolutely locked in but this is what we're supposed to be beginning just hell yeah that's so satisfying the toe down here we're actually supposed to have a gap I believe based on the drawing it says correct amount of toe we're ready to shape this sucker I don't really have a plan so we're going to more or less just start shaping it away I want to expose this Edge first here um gave myself a couple reference lines on the top there's a pocket inside that I can't cut into that scares the living out of me so we're going to see got sender sometimes I will not agree with that let's give it hell I just put on The Lord of the Rings theme music on my headset let's get [Music] hoby not looking good people I don't I don't like it at all I think I ruined it or like a home stretch and I go ahead and it up I need like a bin or something to throw [Music] in all right so we can finally start putting stuff together everything is working good enough that I don't think we have any more parts that need integrated except this Hollow Leg we got to run some power so we're going to cut a mortise and I'm going to drop a power outlet into it would you look at that well these are tapered so I always run into that issue where I can make it just like slightly too small it me in the places I don't like it oh yeah oh yeah that's my girl all right we're in the home stretch on this thing and one of the last things we need to do is cut our bench dog we're actually taking inspiration from padulla Studios if you haven't seen his workbench bar nun the greatest workbench to ever exist things brilliant one of the brilliant things he had that I thought was really cool was pop up bench dogs we're going to cut a hole to hog out most of the material here with the wood out bit these SE things have been super stars on this project and then I'll come back with a router in this template here to do the rest hopefully I don't screw anything up because we are so close to being done I I can't afford a mess up here because I still want to be able to use the normal bench dogs and these hold downs I'm going to actually put some 3/4 in holes into the tabletop as well okay kids so we finally got the pop-up dogs in Sam's working on a little bit of touchup on that end of the bench so we're going to use this allnatural wood finish from Bumble shoots it's a new prodct for them it's the only thing I have enough of to do the table in um but we've used a little bit of it on other stuff and I like it a lot we want to go with a hand applied finish here mostly because we can touch it up later on the best part about a hand applied oil finish though they look so good on Walnut so Feast your eyes yes Chris is just waiting on that paduk to pop look at that paduke oh God y I'm going to do things that can't be on camera that kid loves puke oh yeah it smells so good they use a lot of orange peel in their stuff I prefer their um Cutting Board finish tuo bubble shoots guys they're pretty good to [Applause] [Music] us I know you want to touch the the Duke touch that puke touch [Music] it get your gallon G so every year on Black Friday we go live for a couple hours and we have an absolute blast we get to hang out we're answering question this year I've got some friends that are going to jump on the live stream other creators from around the internet I'll pop some of their faces up here you probably recognize a few of them we're going to be hanging out and talk and Shop I've also got a few guys from the past that have been on live streams that if you're are a longtime fan you're going to want to be around the sea we're going to be giving away this workbench live on air as well you will be able to win this by going on our website hit the link down below and anything that you purchase will give you an entry per dollar to the giveaway we're going to draw it live on Friday at 12:00 p.m. Eastern you also there's ways to win without buying anything check out that link it gives you all the information that you need that being said we also have an exclusive product that I've been working on for years that if you've paid attention you may even know what it is you've seen it you love it you've asked about it and it is coming on Black Friday so you're not going to want to miss out it's going to be your first chance to get the version one exclusive opportunity to own something that you've been asking for for years so Black Friday 10:00 a.m. eastern check it out now let's get this bench together and get the electronic parts in it my table up and he's excellent doesn't sh up at I wonder where it could be holy okay so to mount the logo on the front Chris went ahead and made this which is it's a ring with LEDs on it that we're going to run the power through here so we got to drill a pilot hole and then find a way to to make that mount without effing up so excited I had to sneeze okay little CA weld to hold it how upset are all of you that there's a tool tray and LEDs cuz I know the traditional woodworking Community loves both of those dud this color combo is so good we actually went ahead and added some speakers underneath the bench that will syn with the LEDs which is pretty cool we just have a little 3D printed Mount that goes in with these which is really cool something that I'm fired up about is that I can now pretty much ask Alexa math equations on the go so if I want like fractions divided or converted or millimeters or set timers it'll be really useful the last piece of useful utility I want to add is this bar to kind of hold my iPad while I'm working if I'm using a PDF or we're doing an ad read or whatever I think it's really nice to have this here so we're going to have to hack this thing apart add some modifications to make it work so let's get to that well we got a whole party going on down here and you didn't make this clean and nice at all so the entire intention of this is because we are constantly using the iPad for like talking points and stuff if I'm working over here and I'm like oh I need to see those measurements or if I want to have a disco as po would say I think that's pretty cool I Chris likes it and he doesn't like a lot of stuff he only loves stuff I hate or love there's no like look at that we're in I'm incapable of using an iPad I just Dr my router in your tabletop you you got to find joy in life oh I think it's done Alexa turn on the workbench okay Alexa change the workbench to [Music] Blue [Music] and that's going to be a wrap on this build this thing took me like 120 hours of just me without any help from the guys absolute monster of a project I'm super pumped cuz it turned out sick and I can't wait for it to be the focal point of all of our videos moving forward and I have to ask you to be sure to subscribe so you can see those videos we just crossed 900,000 subscribers and I love each and every one of you and when we hit a million I'm going to do something ridiculous lastly don't forget I'm giving away this bench on Black Friday 10: a.m. eastern join all of us for a ton of fun we're also going to be uh excuse me we're also going to be debuting something brand new for you guys you can only get it on the live stream I'm super excited and then let me know what we're going to hold on actually we're building a fish table next see you guys on that one ...
“+10,000 Step By Step Plans ...even if you don't have a large workshop or expensive tools!“ Yes, Get Access To 12,000 Shed Plans! 👈


No comments