shop table ideas “+10,000 Step By Step Plans ...even if you don't have a large workshop or expensive tools!“ Yes, Get Access To...
 shop table ideas
“+10,000 Step By Step Plans ...even if you don't have a large workshop or expensive tools!“ Yes, Get Access To 12,000 shed Plans! 👈
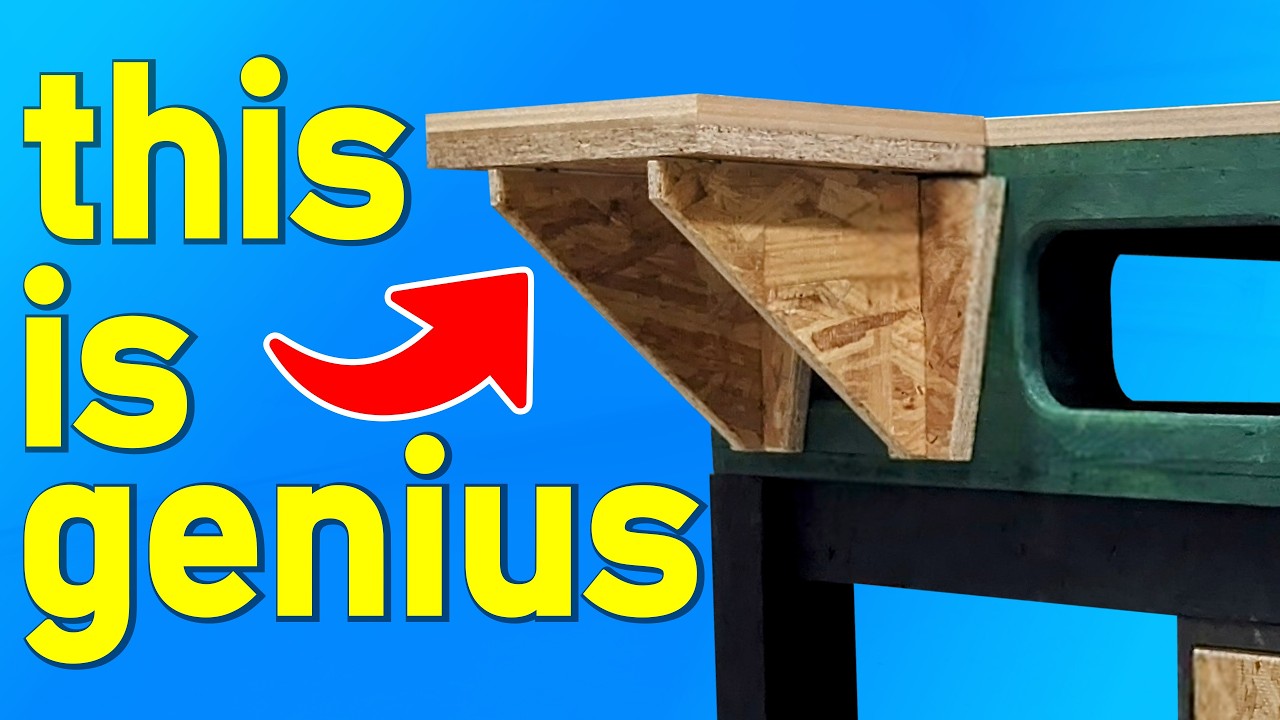
this is my current workbench which is also my router table my outf table my assembly table and my M SAW stand it's a jack of all trades which also means it's a master of none it's missing some important features like a large work surface clamping ability actual storage and something outside of its control a level garage floor this is my new workbench which will address those needs and more but I'm getting ahead of myself I do have a few obstacles when it comes to building this new workbench the the size of my shop constantly overestimating my skill level and I want the cost of this workbench to be reasonable and cost effective so that means no Hardwoods no plywoods and no 2x4s either so that leads us to the elephant in the room I'm just going to rip the bandaid off now this workbench is going to be made out of OSB hold up wait a minute don't click off this video this is not a required feature this workbench is a bit of a proof of concept idea so consider the OSB the rough draft material in this beta test I originally was going to make this out of plywood but there's a problem I'm old yet young enough to remember the days when Pine plywood at Home Depot I'm sorry cabinet grade plywood panels were around $35 a sheet but today it's $56 and regular plywood is now dang I'm sorry that can't be right $83 that's crazy but then I remember that ancient proverb if you can make it out of plywood you can make it out of obb if you can dodge a wrench you can dodge a ball same principle the OSB equivalent is $30 and just like Baltic Birch OSB has no voids in it I mean technically it is true from a certain point of [Music] view I got the idea to make this workbench base from hooked on wood side note he sells plans for it if you're interested Link in the description I chose this base as it has the strength I need for my work which is mainly dealing with slabs sheet Goods hardwood boards a door and occasionally some pallet wood Semi-Pro tip label your pieces while you're cutting them out I had about 56 pieces I needed to cut out and it can get pretty easy to lose track of them when trying to be cheap mistakes can be costly so cut twice measure once as they say now that I have everything cut and ripped down this is when my plan started to fall apart let me explain my plan is to do the glue up in two phases first the intersections of the legs and then the outer boards however I don't laminate very often so I didn't think through this whole glue up process enough and I quickly started to realize I have some problems I don't own enough clamps so I decided to use brad nails to clamp these boards together while the glue dried but then I started to think is shooting a bunch of nails into this wood the best idea especially since I haven't thought through how I'm actually going to connect all the different pieces to make the base so the answer to myself was no having a plan is one thing but having a good plan is a whole lot better I'm just going to take my time and be patient with the clamps that I have I considered using screws but I didn't want to make unnecessary holes in the base this was most likely a foolish decision on my part as this is the intersections and won't be visible but at the moment it made perfect sense to me not so much now now that I've glued up all the intersections and they've had time to dry I went ahead and cut them to length which made me realize problem two of my plan at this point I left all the boards over size the plan was to rip them down to their final width once all the pieces have been glued together it's always important to know your own skill level and work within your ability for me there was no way that I was going to be able to perfectly glue these boards up parallel and also achieve a 90° open mortise joint whenever it's necessary I make sure to take the time to make a jig it's literally number four on my shop rules this simple jig made from off Cuts will make up for my lack of glue-up skills I went ahead and ripped all the pieces down to their final Dimension then I used the jig to align the boards added a few brad nails to hold everything into position then I could clamp everything together and wait for the glue to dry when making this type of Base there's one more thing you need to to think about the main stretchers and leg post are going to be attached with an open slot mortise and it now I'm guessing but when you're using a higher grade sheet good the quality control is going to be much higher so regardless if you're using sheet plywood or OSB you might want to keep in mind that you should pull the sheet goods from the same bundle to try to eliminate the next problem the OSB that I'm using I didn't get on the same day from the same bundle as I was using sheets that I had left over and some I just bought and there's a 1/16 of an inch difference in thickness hindsight is a powerful drug and if I was doing this again I would make sure all the thicknesses were roughly the same size so I went ahead and just used the blunt force method and it worked did I get a little bit of Separation well yes and I will do with that later I may sure to leave the stretcher pieces long so I could go ahead and use a pull saw and cut everything flush to show that I'm a real woodworker and not some crazy OSB loving beta Mel are you confused by that statement me too you got thech you got the power to connect the base I'm going to use pocket holes I'm not a big fan of pocket holes and it's probably not for the reason you're thinking semipro tip don't set your pocket holes too deep and make sure not to over Drive the screw as this will cause the wood to split I've done this with plywood before so it's not unique to OSB and I know some people are thinking well duh but there's at least one person out there that needed to hear this if you're wondering is this base going to be strong enough after all it's made out of OSB well I'll go ahead and walk on it I'm not sure how much I weigh right now less than 300 more than 270 so strong enough I went ahead and painted the base as this was a good way for me to get rid of some extra paint that I had laying around and my thinking here is that this should help with any moisture absorption problems in the future maybe but I don't know for sure as I'm still getting used to Texas and its humidity I designed my workbench top after Ron Paul smart bench he sells plans for it if you're interested Link in the description I went ahead and chose this style because I like it versatility bonus it's pretty simple to build but that won't stop me from being extra as you'll see I use my CNC to create some templates for this workbench top but this could also be done using a table saw a miter saw a hole saw bit and a jigsaw I used the templates in combination with the table saw some screws a spade drill bit and a flush term router bit to make sure that everything was the exact same dimensions for all the workbench top pieces this way I remov the human error which is me that didn't sound right but I think you know what I mean I did try to use my jigsaw table to first cut out the cutout but that took way too much time the faster route was just using the spade bit and the router table to cut out the opening since this is OSB it cut pretty easily but faster isn't always cleaner and it left me with a lot of dust to clean up even with that extra cleanup time it was worth it as I hate any task that requires me to use a jigsaw I added a well-deserved roundover to the cutouts to avoid any unnecessary [Music] splinters then I could go ahead and paint all the parts I'm going to give you a free tip that doesn't just apply to OSB anytime you're using a butt joint pre-drill and try to avoid screwing too close to the edge that way you can avoid splitting the wood disappointed what it was a free tip I didn't say it was going to be mind-blowing I made sure to add glue to the joints but I also painted all the faces of the boards so I don't know how much holding power this will really give but I'm more than made up for it with all the screws that I added to this workbench for the top and bottom of the workbench I left everything oversized that way I could come back with my tracks saww and a router bit to flush everything up if you wanted you could cut the top and bottom to size but again I'm removing my probable error from the equation if anyone has any good router dust collection tips let us know in the comments as I'm clearly in need of it but don't you worry I did come back back and paint those exposed OSB edges I know big side relief at this point you could attach the work toop to the base add some scrap wood footies to raise it off the floor cover the lower shelf and you'd have a pretty solid workbench for about $137 here's a quick breakdown in case you're wondering but a workbench wouldn't be complete without some accessories so let's do that a replaceable work surface is a nice to have since this workbench is also going to be acting as the outf table it needs to have a smooth surface so we need to cover the OSB if you're looking to save some money you could get a sheet of hardboard for about $15 and that would work great but for me I'm going to go with MDF 3/4 in MDF this brings me back to the CNC not because I'm too lazy to cut out a square but because I'm too lazy to cut out a bunch of circles this could be done with any type of 3/4 in bit or a 20 mm bit completely up to you but the CNC will help me not to make any errors cnc's are not foolproof so I seem to be a master of disaster which means I also need to be a problem solver let me explain I see you once the holes were cut out I got an error message and the CNC stopped working so I went ahead and recreated the cut file but this time without the holes so now we should be good to go but then I went ahead and hit one of the screws that was holding down the MDF not once not twice but all four times to pass that area which caused the CNC to get out of position or I messed something up in the cut file either way I look at it it was me doing something wrong the second half of the MDF top cut out fine but the two tops are clearly different shapes since I was creating two MDF tops to begin with I should have just ran the cut file for the second top and use that as a template to cut out the first one as they are mirror images to each other in the end I had to do that and more to fix the issues anyways so the saying is true shortcuts are always shortsighted to add insult to injury I dropped one of the tops and when I did that my instincts kicked in and I reached for the MDF which was not a great idea thankfully though I didn't injure myself and the only thing to be damaged was the corners of the top now that this is fixed we can go ahead and talk about how we're actually going to attach it down threaded inserts is the answer to that rhetorical question you can go ahead and screw down the top but I'm using this bench as a little bit of a proof of concept as one day plywood will go down and cost or I might just win the lottery so I'm planning right now for version two I had the CNC pre-drill all the holes where the threaded inserts were going to be located good idea in theory but the execution was poor on my part trying to counter syn the holes afterwards didn't really work in in the end it was just easier for me to counter sync new holes myself and drill them all out if I was a smarter man I would have used the CNC to also counter sync those holes you don't know what you don't know which is very true so I'm not done making mistakes I thought you couldn't mess up threed inserts but here I am this is the first insert hole that I drilled and I learned some important lessons from it this should come to no surprise but don't set your inserts too close to the edge of your OSB for your plywood it's not the best idea this corner of the bench now looks like the first Pancake you make which also never comes out right I'll just go ahead and count all the mistakes that I've made with this bench as knowledge gained for version two fixing the top Min removing material so I'm just going to go ahead and use some scrapped MDF to fill in that Gap and I'm just going to screw this little piece down as when I replace this top in the future this shouldn't be needed well hopefully it can be very easy to over complicate a build so I'm going to go ahead and take the easy way out when it comes to Future glue-ups I'm just going to use plastic like painters tape or this floor protector roll or you could even use some cardboard like this but if you really want to you could laminate the top completely up to you part of the reason why I chose to build this type of workbench base is because my garage floor is unleveled and has random low spots as you can tell the leveling feet came with these screws which is nice but since this is OSB I'm going to use some 2-in long screws I don't trust that these small screws won't just rip out one day also if you recall I used the blunt fourth method when assimilating this base which caused a bit of Separation so this ended up being a win-win double win situation that's better now the perfect small shot workbench would be pretty useless if you couldn't easily move it around but I don't always seem to mind myice Sur these so using casters that can be removed will help avoid the inevitable which is a smart move on my part using some off cuts and some superglue I made a quick jig to help me with the placement of the wheel brackets life is a little better when you treat your future self right I attached the wheel brackets with 2 and 1/2 in Long screws because again this is OSB this is a rare case of me working smarter and not harder normally it's the other way around from the leftover OSB I'm going to make a little cabinet to store all of my workbench related items I'm really nailing my new shop rule about making jigs jigs don't always have have to be pretty this jig here would be even better if I had some toggle clamps but I'm working in the moment and in this moment this is all I had I'm not going to use any fancy joinery not because this is OSB but because this is shop furniture and I've been making shop related items for about 4 months now and I'm really ready to move on I went ahead and use some scrap OSB to act as draw slides or at least what I'm calling dra slides and attach them with some glue and Nails it's definitely not anything fancy but it gets the job done for shop furniture for the drawers I'm going to keep everything really simple some glue a nail to hold everything together a little bit of pre-drilling add a few screws and you got a drawer box for the bottoms I just went ahead and use some left over/ qu in MDF some glue and nails and to add a little clas I went ahead and gave the drawers a little bit of a roundover I went ahead and gave the cabinet a coat of paint and then I could go ahead and install it with the few screws to hold everything in place when it needed I can easily expand and add more drawers but for now this will do but I did add a little bit of fun to the drawers we have the duck of Oregon the duck of Gizmo the duck of the night and last and least of all the duck of edgelord Dum [Applause] okay you know how I said I was too lazy to drill circles well I'm going to have to do that this is an unfortunate yet necessary step to be able to clamp down items to the work surface even more unfortunate I had to use my router and a flush trim bit to clean up all the holes I put this whole process on hold for as long as I could as I knew this is going to create a nasty little mess for clamping with this workbench I went ahead and just bought these clamps for now with which work also great with a tracks saww as I'm in this mode of not buying tools until I need them being broke also helps with that can't make the scene if you don't have the green one thing that I didn't account for is adding that additional thickness with the removable top would make it so that these clamps couldn't just slide into place so I have to remove this screw and then come up from the bottom of the work surface to be able to clamp anything down not the worst thing but also slightly annoying another nice thing about this bench top is that you can clamp wood to the bench itself which acts as a pseudo visce which for me is good enough at least for now this last accessory has a lot of great potential but it's also one of those ideas that could either be great or a complete bust I'm not crazy enough to think that somebody hasn't thought about this already but as it's said in ecclesiastics what has been is what will be and what has been done is what will be done and there's nothing new Under the Sun so I'm pretty sure somebody else has thought of this but I couldn't find it on the internet so maybe it's mine or maybe it's Maybelline I don't know I created a few versions of the wings that way I could test them out over time to see which one works best one version of the Wings just slide into place while the other version uses a simple slot joint to secure the wings to the workbench I went ahead and created a jig to help me draw out matching holes in each of the Wings looks pretty in the middle the holes I drilled out will be filled with some glue and a threaded insert to connect the wings and the extension tops speaking of tops I actually made two versions of that as well a small version for those times that I just need a little bit of extra work surface and a medium version for those times where I need a medium version I had plans to make a full length extension but I'll have to save that for version two but this whole process wasn't just Gumdrop rainbows and unicorns in retrospect I should have made the workbench top out of two layers of MDF as the OSB doesn't actually have even thickness across all the board or the sheet whichever one you want to call it I didn't realize this when I was designing this part of the workbench so I just use some playing cards and washers to get everything leveled with each other depending on your need this could be completely a non-issue but for me I want the extension Wings to be leveled with the workbench I really like this idea and I'm already trying to figure out ways to improve it as you can probably tell it's a little cumbersome putting this thing together and I want to make it a smoother process in the future so apparently I didn't account for where the location of the front wings were going to be when designing this I'll need to address this inv version too as I need to add some additional screw holes here and here as I don't trust the current location we'll provide enough support strength with the wings attached the workbench surface can go from a length of 62 in to 79 in or from a work surface of 31 in to 48 in I made sure to label where all the wings Go For My Future Self as I said before this OSB thickness varies in thickness if you're wondering why threaded inserts well I really like the idea to be able to Flat pack things when I'm not using them glue and screws would also work but then you're going to need the room to be able to store them fully assembled which I don't have in total this workbench cost me $220 which doesn't include the cost of the Wings which I mainly made with leftover materials and the pair of clamps that I bought I'm Joseph with five de Studio hope to see you next time wouldn't be the same without you or you're not supposed to throw that one or you can even use oops some cardboard like this ...
“+10,000 Step By Step Plans ...even if you don't have a large workshop or expensive tools!“ Yes, Get Access To 12,000 Shed Plans! 👈


No comments